
Painless TinyML Convolutional Neural Network on your Arduino and STM32 boards: the MNIST dataset example!
Are you fascinated by TinyML and Tensorflow for microcontrollers?
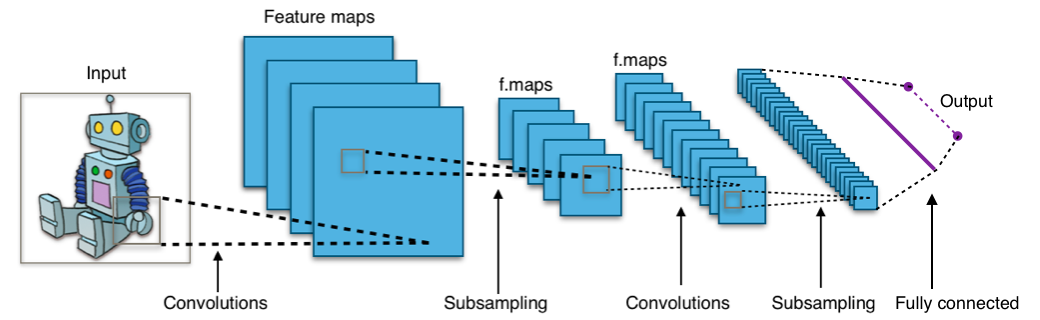
Do you want to run a CNN (Convolutional Neural Network) on your Arduino and STM32 boards?
Do you want to do it without pain?
EloquentTinyML is the library for you!
EloquentTinyML, my library to easily run Tensorflow Lite neural networks on Arduino microcontrollers, is gaining some popularity so I think it's time for a good tutorial on the topic.
If you're a seasoned follower of my blog, you may know that I don't really like Tensorflow on microcontrollers, because it is often "over-sized" for the project at hand and there are leaner, faster alternatives.
Nonetheless, Tensorflow is gaining much popularity in the embedded world so I'll try to give my contribute too.
In this tutorial, I'm going to show you step by step how to train a CNN in Tensorflow and deploy it to you board: I tested the code both on the Arduino Nano 33 BLE Sense and the STM32 Nucleus L432KC.
Table of contents
How to train a CNN in Tensorflow
I'm not an expert either in Tensorflow nor Convolutional Neural Networks, so I kept the project as simple as possible. I used an image-like dataset to create a setup where CNN should perform well: the dataset is the MNIST handwritten digits one.
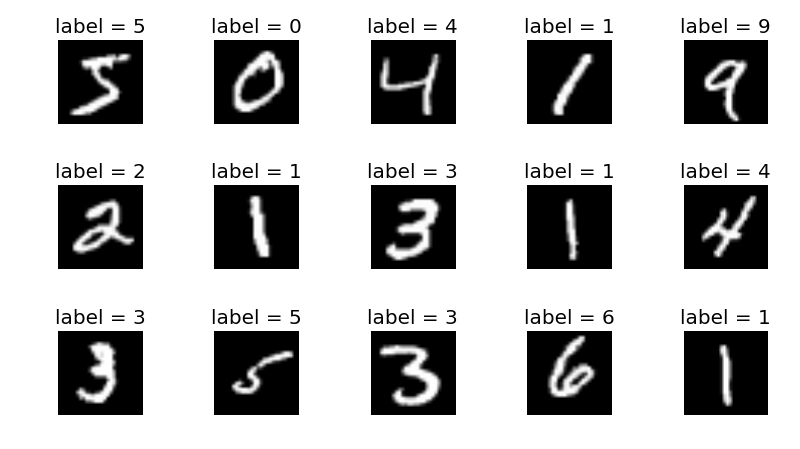
It is composed by 8x8 images of handwritten digits, from 0 to 9 and can be easily imported via the scikit-learn Python package.
Regarding the CNN topology, I wanted to stay as lean as possible: the goal of this tutorial is to teach you how to deploy your own network, not about achieving 100% accuracy.
Let's see step by step how to produce a usable model.
Step 1. Import the libraries
We will need numpy and Tensorflow, of course, plus scikit-learn to load the dataset and tinymlgen to port the CNN to plain C.
import numpy as np
from sklearn.datasets import load_digits
import tensorflow as tf
from tensorflow.keras import layers
from tinymlgen import port
Step 2. Generate train, validation and test data
To train the network, we need:
training data: this is the data the network uses to learn its weightsvalidation data: this is the data the network uses to understand if it's doing well during learningtest data: this is the data we use to test the network accuracy once it's done learning
def get_data():
    np.random.seed(1337)
    x_values, y_values = load_digits(return_X_y=True)
    x_values /= x_values.max()
    # reshape to (8 x 8 x 1)
    x_values = x_values.reshape((len(x_values), 8, 8, 1))

    # split into train, validation, test
    TRAIN_SPLIT = int(0.6 * len(x_values))
    TEST_SPLIT = int(0.2 * len(x_values) + TRAIN_SPLIT)
    x_train, x_test, x_validate = np.split(x_values, [TRAIN_SPLIT, TEST_SPLIT])
    y_train, y_test, y_validate = np.split(y_values, [TRAIN_SPLIT, TEST_SPLIT])

    return x_train, x_test, x_validate, y_train, y_test, y_validate
Step 3. Create and train the model
Now we have to create our network topology.
As I stated earlier, I wanted to keep this as simple as possible (also considering that we're using a toy dataset): I added a single convolution layer (without even max pooling) followed by the output layer.
def get_model():
    x_train, x_test, x_validate, y_train, y_test, y_validate = get_data()

    # create a CNN
    model = tf.keras.Sequential()
    model.add(layers.Conv2D(8, (3, 3), activation='relu', input_shape=(8, 8, 1)))
    # model.add(layers.MaxPooling2D((2, 2)))
    model.add(layers.Flatten())
    model.add(layers.Dense(len(np.unique(y_train))))

    model.compile(optimizer='adam', loss=tf.keras.losses.SparseCategoricalCrossentropy(from_logits=True), metrics=['accuracy'])
    model.fit(x_train, y_train, epochs=50, batch_size=16,
                        validation_data=(x_validate, y_validate))
    return model, x_test, y_test
Step 4. Testing the model accuracy
Do you think this topology is too simple to learn something useful in so few epochs?
Think again: it achieved 97% accuracy!
Not bad.
def test_model(model, x_test, y_test):
    x_test = (x_test / x_test.max()).reshape((len(x_test), 8, 8, 1))
    y_pred = model.predict(x_test).argmax(axis=1)

    print('ACCURACY', (y_pred == y_test).sum() / len(y_test))
Step 5. Exporting the model
Once we have a trained model that performs well, we want to deploy it to our microcontroller. Thanks to the tinymlgen packages, is as easy as a one-liner.
if __name__ == '__main__':
    model, x_test, y_test = get_model()
    test_model(model, x_test, y_test)
    c_code = port(model, variable_name='digits_model', pretty_print=True)
    print(c_code)
How to run a CNN on Arduino and STM32 boards with EloquentTinyML
Ok, now we have the content we need to create an Arduino sketch to run the CNN on our microcontroller.
We will use the EloquentTinyML library to do this without pain.
This is a library to run TinyML models on your microcontroller without messing around with complex compilation procedures and esoteric errors.
You must first install the library at its latest version (0.0.5 or 0.0.4 if not available), either via the Library Manager or directly from Github.
#include <EloquentTinyML.h>

// copy the printed code from tinymlgen into this file
#include "digits_model.h"

#define NUMBER_OF_INPUTS 64
#define NUMBER_OF_OUTPUTS 10
#define TENSOR_ARENA_SIZE 8*1024

Eloquent::TinyML::TfLite<NUMBER_OF_INPUTS, NUMBER_OF_OUTPUTS, TENSOR_ARENA_SIZE> ml;

void setup() {
    Serial.begin(115200);
    ml.begin(digits_model);
}

void loop() {
    // a random sample from the MNIST dataset (precisely the last one)
    float x_test[64] = { 0., 0. , 0.625 , 0.875 , 0.5   , 0.0625, 0. , 0. ,
                    0. , 0.125 , 1. , 0.875 , 0.375 , 0.0625, 0. , 0. ,
                    0. , 0. , 0.9375, 0.9375, 0.5   , 0.9375, 0. , 0. ,
                    0. , 0. , 0.3125, 1. , 1. , 0.625 , 0. , 0. ,
                    0. , 0. , 0.75  , 0.9375, 0.9375, 0.75  , 0. , 0. ,
                    0. , 0.25  , 1. , 0.375 , 0.25  , 1. , 0.375 , 0. ,
                    0. , 0.5   , 1. , 0.625 , 0.5   , 1. , 0.5   , 0. ,
                    0. , 0.0625, 0.5   , 0.75  , 0.875 , 0.75  , 0.0625, 0. };
    // the output vector for the model predictions
    float y_pred[10] = {0};
    // the actual class of the sample
    int y_test = 8;

    // let's see how long it takes to classify the sample
    uint32_t start = micros();

    ml.predict(x_test, y_pred);

    uint32_t timeit = micros() - start;

    Serial.print("It took ");
    Serial.print(timeit);
    Serial.println(" micros to run inference");

    // let's print the raw predictions for all the classes
    // these values are not directly interpretable as probabilities!
    Serial.print("Test output is: ");
    Serial.println(y_test);
    Serial.print("Predicted proba are: ");

    for (int i = 0; i < 10; i++) {
        Serial.print(y_pred[i]);
        Serial.print(i == 9 ? '\n' : ',');
    }

    // let's print the "most probable" class
    // you can either use probaToClass() if you also want to use all the probabilities
    Serial.print("Predicted class is: ");
    Serial.println(ml.probaToClass(y_pred));
    // or you can skip the predict() method and call directly predictClass()
    Serial.print("Sanity check: ");
    Serial.println(ml.predictClass(x_test));

    delay(1000);
}
That's it: if everything went fine, you should see that the predicted class is 8.
CNN on Arduino and STM32 figures
I'll report the figures I get for compiling and running this project on the two boards I used.
| Board | Flash | RAM | Inference time |
|---|---|---|---|
| Nucleus L432KC | 154560 | not available* | 7187 |
| Arduino Nano 33 BLE Sense | 197656 | 56160 | 9400 |
I used the Grumpyoldpizza compiler for the Nucleus, which doesn't report back the RAM usage
And you?
Were you able to deploy a CNN to your microcontroller thanks to this tutorial? Or are you having troubles?
Let me know in the comment and I will help you or share your experience with us.
You can find the whole code on Github.