
This project was conceived for the TensorFlow Microcontroller Challenge and it's a simple realization of a trackpad-like, AI-powered, programmable "touch" surface made of cheap LDRs (light dependant resistors). In it's current form, it is a small surface, but I see scaling it up to create big touch surface, without the expensiveness of true touch sensing.
You can find all the files of the project on Github
Table of contents
Step 1. The hardware
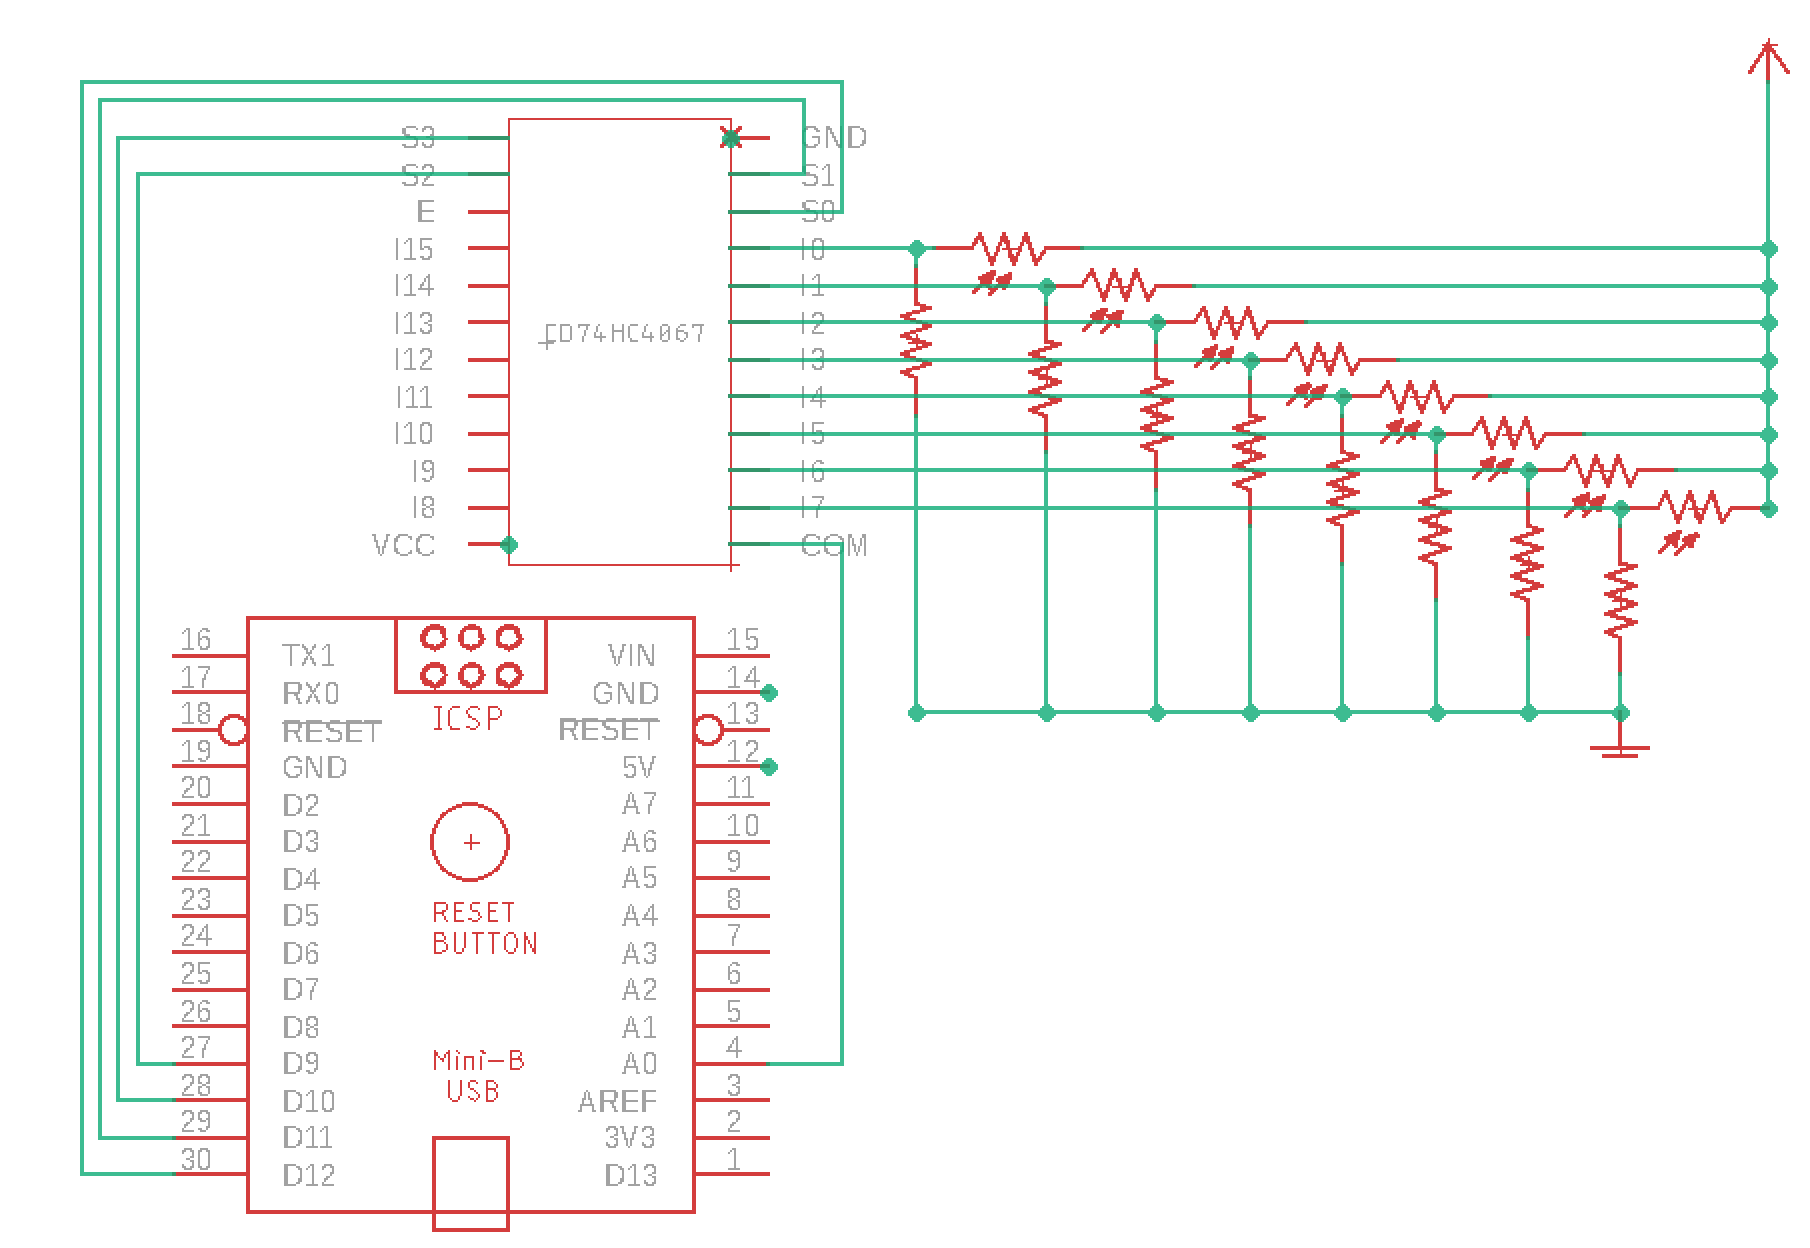
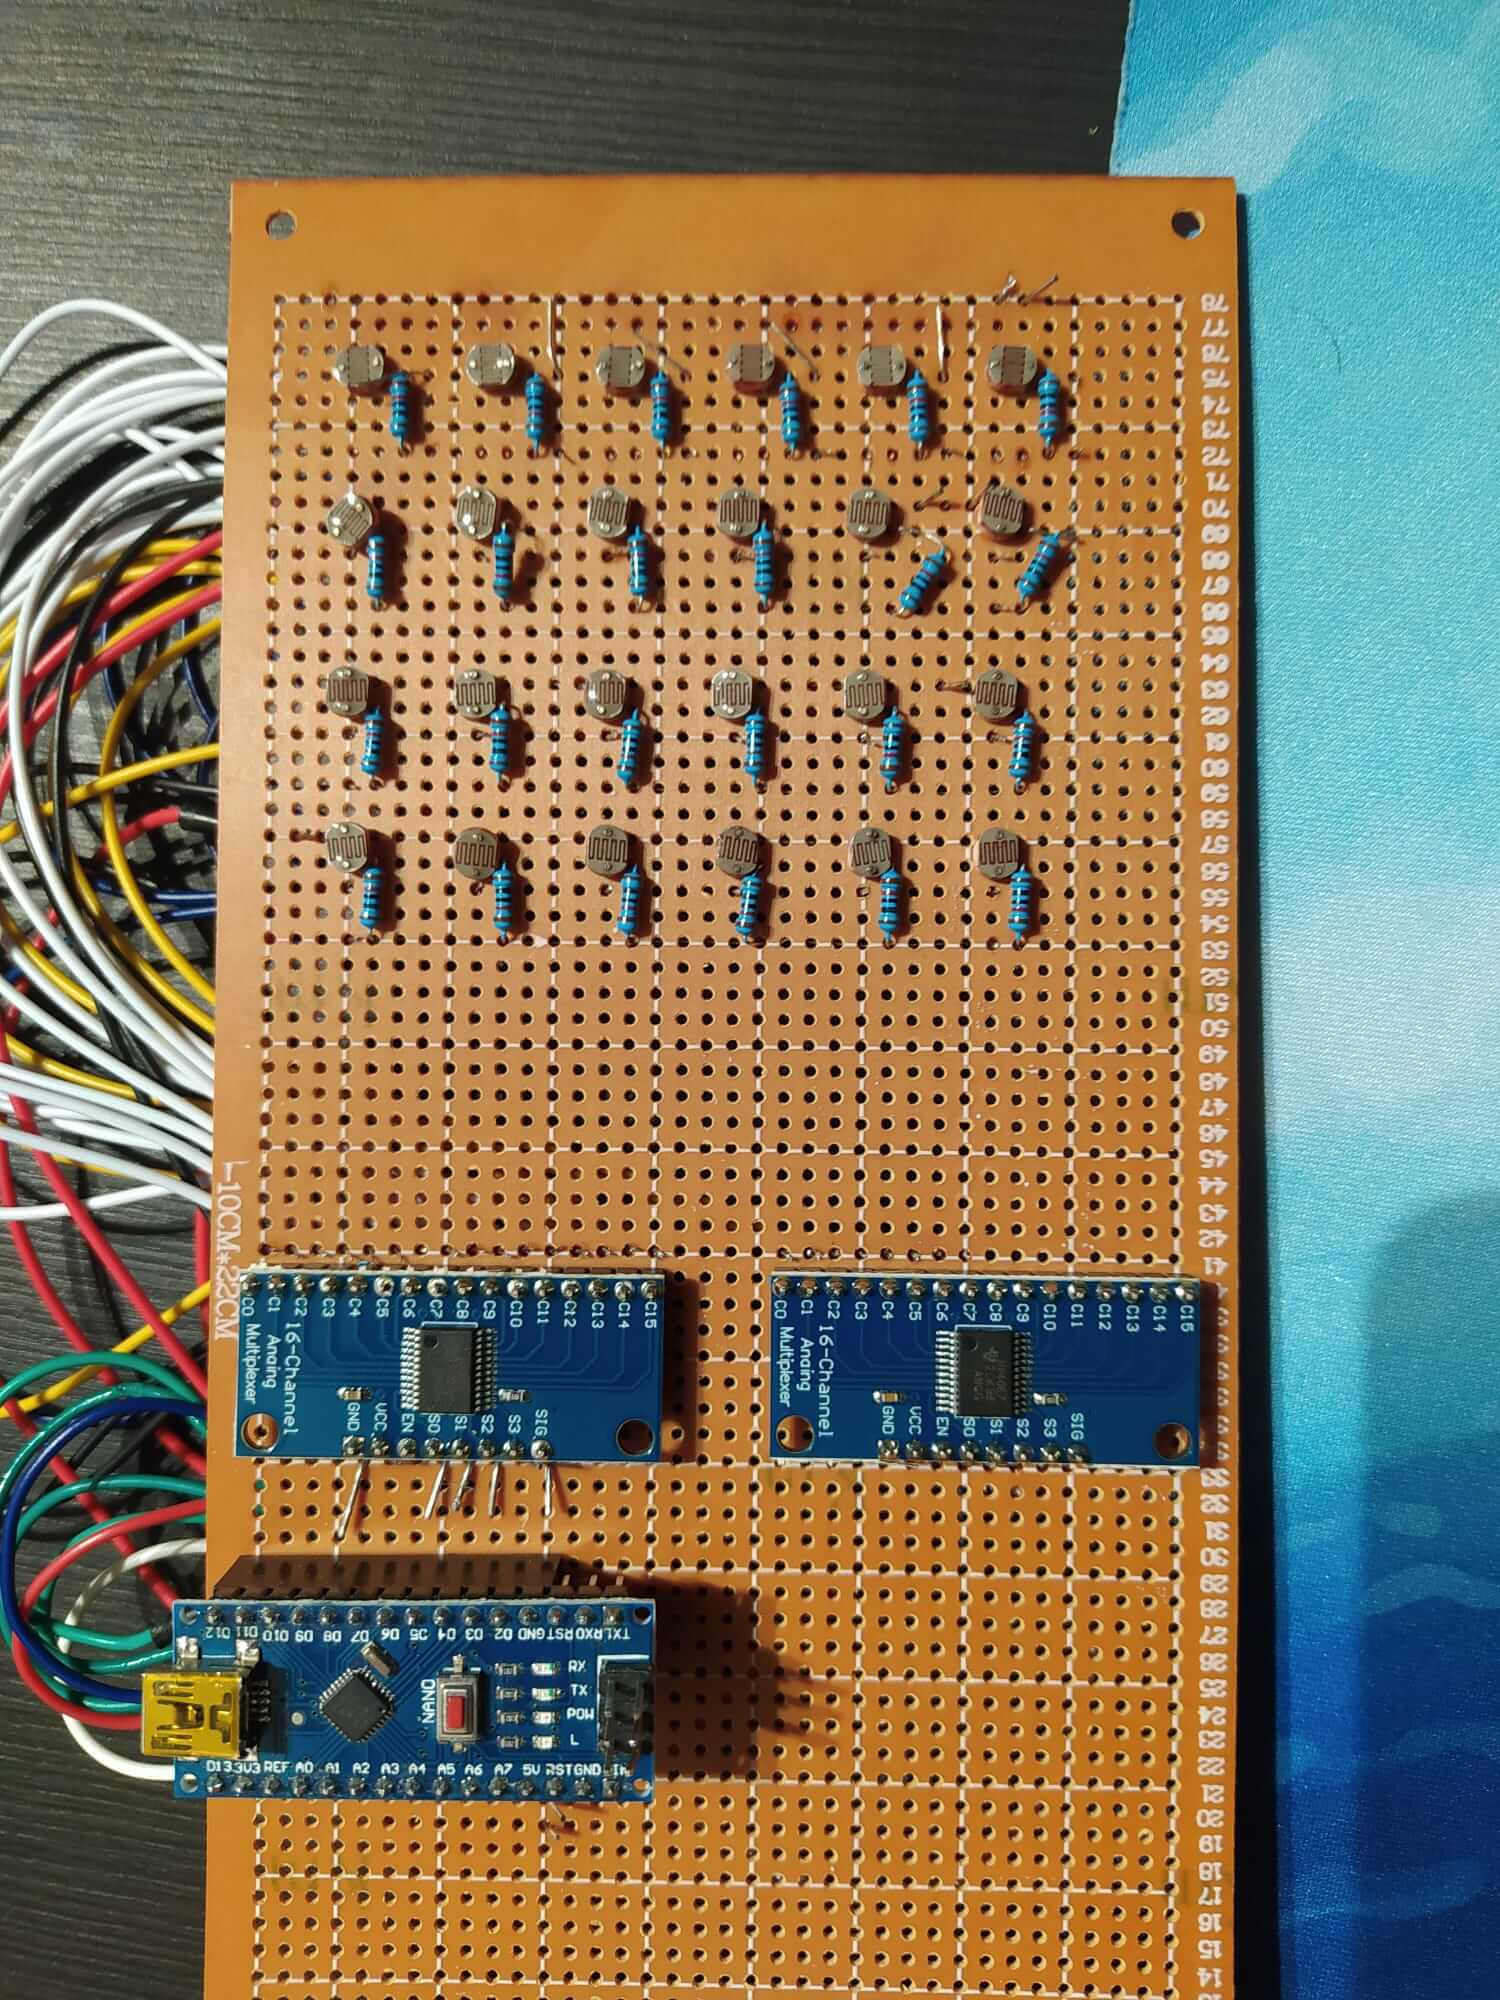
At the hardware level, the project is made of an array of cheap LDRs (a.k.a photocells) - the ones you find at 1$ per 10 pcs - arranged in a grid format. Since they're required in a high number (this version employs a 6 x 4 grid), you will also need an analog multiplexer, like the CD74HC4067, which features 16 I/O channels.
The wiring is simple: instead of connecting the LDR directly to the Arduino board, you wire it to the multiplexer, which features a single output that goes to the analog pin of the board. Which one of the 16 channels is active is dictated by the 4 control pins of the CD74HC4067: each of the 16 possible logic combinations enable each of the channels.
I used an Arduino Nano 33 BLE Sense, but any other TinyML-compatible board will do the job.
Step 2. The features
For this project we're going to classify which gesture is being performed on the trackpad among a limited set of possibilities:
- swipe left
- swipe right
- swipe up
- swipe down
- tap left
- tap right
Almost the same you can perform on a real trackpad.
Which features are we going to use to detect the gestures? We're keeping it simple and use a fixed-size window of readings as input features.
Starting from the moment we detect that the trackpad is touched, we sample the sensors at a fast rate (~200 Hz in this setup) for a few milliseconds (500 in this setup).
We then arrange the readings one after the other to create a long array of values that will become the input for our neural network.
For your own use case, you may want to increase the sample frequency or the window size, depending on the kind of gestures you're interested in detecting.
Step 3. Data acquisition sketch
Now that we have our board set up, it's time to start writing the software. I created a dedicated class called LDR which handles all the logic of selecting the mux channel and reading the sensors one by one. Since my setup uses 24 sensors in total, the LDR is made to handle up to 32 sensors (2 x 16 channels) without any modification: if you want to increase the number, you have to manually edit the class.
Apart from letting you set a bunch of configuration params (which I'll explain later), the most important piece of code is probably the read() method:
for (uint8_t i = 0; i < max(n0, n1); i++) {
    mux->channel(i);

    if (i < n0)
        readings[i] = analogRead(a0);

    if (i < n1)
        readings[n0 + i] = analogRead(a1);
}
The above function loops on the number of inputs and reads each of the 2 multiplexers according to the number of inputs of each.
Now let's see what configurations are available for the LDR class:
// set mux control pins
ldr.setMuxPins(12, 11, 10, 9);
// set analog pin wired to mux 1
ldr.setAnalogInput1(A0);
// set analog pin wired to mux 2
ldr.setAnalogInput2(A2);
// set number of sensors connected to mux 1
ldr.setNumberOfInputs1(16);
// set number of sensors connected to mux 2
ldr.setNumberOfInputs2(8);
// set acquisition frequency in samples per second
ldr.setFrequency(200);
// set max value of sensor (you have to tailor this value to your own setup)
ldr.setMaxValue(100);
// set min value to consider a sensor as "triggered" to detect when a gesture starts
ldr.setStartOfTouchThreshold(40);
// set min number of sensors that need to be "triggered" to detect when a gesture starts
ldr.setStartOfTouchTriggers(4);
The TfTrackpadTraining sketch implements a simple CLI (command line interface) to read the LDR and print the features that will be used for classifying each gesture.
void loop() {
  if (Serial.available())
    command = Serial.readStringUntil('\n');

  if (command == "calibrate") {
    command = "";
    Serial.println(ldr.calibrate() ? "Calibration done" : "Calibration error - you must configure the MUX first");
  }

  else if (command == "raw") {
    ldr.read();
    ldr.print();
  }

  else if (command == "read") {
    ldr.readCalibrated();
    ldr.print();
  }

  else if (command == "record") {
    while (!ldr.detectStartOfTouch())
      ; // await for start of gesture

    // read WINDOW_IN_SAMPLES times the LDR
    for (uint16_t t = 0; t < WINDOW_IN_SAMPLES; t++) {
      ldr.readCalibrated();
      memcpy(inputs + t * NUM_SENSORS, ldr.readings, sizeof(float) * NUM_SENSORS);
    }

    // print the readings
    for (uint16_t i = 0; i < NUMBER_OF_INPUTS; i++) {
      Serial.print(inputs[i]);
      Serial.print(i == NUMBER_OF_INPUTS - 1 ? '\n' : ',');
    }

    delay(1000);
  }

  else {
    command = "";
  }
}
To record your very own samples, load the sketch on your board, then open the Serial monitor and type "raw": you should see the raw values read from the LDRs - open up the Serial plotter so you can see a pretty plot of the readings and check that everything is working fine.
Now, to actually record the samples:
- open the Serial monitor and type "calibrate", to start the calibration process (it will take less than 1 second)
- type "record"
- start performing a gesture: each time you touch the trackpad, it will print a list of numbers
- record 20-40 samples of each gesture to create a consistent dataset and save each gesture to a CSV file
Step 4. Train the neural network with Tensorflow
You can find the TfTrackpad training notebook on Github. I will embed it here too for a quick view.
As you can see from the classification report, the accuracy is quite good: the only major problem is that the model sometimes confuses "swipe up" with "swipe down". Probably we should add more samples to the training data or try to perform the gestures a bit different one from the other.
Step 5. Deploy to the microcontroller
Our last step is to deploy the model back to our board. You will need to copy the tinymlgen.port() output to a file called nn.h in your sketch and copy the following main sketch.
It makes use of the EloquentTinyML library, so it's very straight-forward to read and undestand. As for the training sketch, it awaits for a gesture to begin, then reads WINDOW_IN_SAMPLES times the LDRs and arranges the values into a flat array.
#include <EloquentTinyML.h>
#include <eloquent_tinyml/tensorflow.h>

#include "LDR.h"
#include "nn.h"

#define NUM_SENSORS 24
#define WINDOW_IN_SAMPLES 100
#define N_INPUTS (NUM_SENSORS * WINDOW_IN_SAMPLES)
#define N_OUTPUTS 6
#define TENSOR_ARENA_SIZE 32*1024

LDR ldr;
String command;
float inputs[NUMBER_OF_INPUTS] = {0};
Eloquent::TinyML::TensorFlow::TensorFlow<N_INPUTS, N_OUTPUTS, TENSOR_ARENA_SIZE> nn;

String idxToLabel(uint8_t idx);

/**
 *
 */
void setup() {
  Serial.begin(115200);
  delay(3000);
  Serial.println("Begin");

  // configure the same as the TfTrackpadTraining sketch
  ldr.setMuxPins(12, 11, 10, 9);
  ldr.setAnalogInput1(A0);
  ldr.setAnalogInput2(A2);
  ldr.setNumberOfInputs1(16);
  ldr.setNumberOfInputs2(8);
  ldr.setFrequency(200);
  ldr.setMaxValue(100);
  ldr.setStartOfTouchThreshold(40);
  ldr.setStartOfTouchTriggers(4);

  // initialize the neural network
  if (!nn.begin(model_data)) {
    Serial.print("NN initialization error: ");
    Serial.println(nn.errorMessage());

    while (true) delay(1000);
  }

  ldr.calibrate();
  Serial.println("Start predicting...");
}

/**
 *
 */
void loop() {
  // await for start of gesture
  if (!ldr.detectStartOfTouch())
    return;

  Serial.print("Detected ");
  Serial.flush();

  // read window of readings
  for (uint16_t t = 0; t < WINDOW_IN_SAMPLES; t++) {
    ldr.readCalibrated();
    memcpy(inputs + t * NUM_SENSORS, ldr.readings, sizeof(float) * NUM_SENSORS);
  }

  // classify
  Serial.println(idxToLabel(nn.predictClass(inputs)));
  delay(1000);
}

/**
 * Convert class idx to readable name
 */
String idxToLabel(uint8_t idx) {
  switch (idx) {
    case 0: return "swipe right";
    case 1: return "swipe left";
    case 2: return "swipe up";
    case 3: return "swipe down";
    case 4: return "right tap";
    case 5: return "left tap";
    default: return "????";
  }
}
Demo
Here is a short demo video of the system in action.
You can find all the files of the project on Github.