
Have you ever wanted to perform person detection on Arduino or ESP32 boards? Found it difficult to custimize the sketch to suit your needs? Fear no more!
Person detection on Arduino and ESP32 microcontrollers doesn't have to be difficult: with the right library, you only need 3 lines of code to perform state-of-the-art person detection. You use TensorFlow Neural Networks without any boilerplate and verbose code using the EloquentTinyML library.
If you searched Google for person detection on Arduino boards (using the Arduino IDE), you may have found a few different results.
Many of them vary in terms of ease of use and level of detail: when I read them, I had a very hard time figuring out how I should put all the pieces together to make it work flawlessy.
And I consider myself an "experienced" programmer!
After I had it finally working, I spent the same amount of time figuring out how I could customize the sketch, which was full of verbose and seaminglessy non-sense code.
That's why I'm writing this tutorial.
Person detection on Arduino compatible boards (Portenta Vision Shield, Nano 33 BLE Sense TinyML Kit, ESP32 cam) shall not be hard. In fact, it can be as easy as 3 lines of code. No non-sense, stright-to-the-point, 100% customizable. You only need to install the EloquentTinyML library, choose the camera configuration and follow a couple simple steps.
I'm going to show you how!
Step 1/3: Install EloquentTinyML library
EloquentTinyML is my library to run TensorFlow Neural Networks on Arduino boards without hassle.
You can install via the Arduino IDE Library Manager. Be sure to install version 2.4
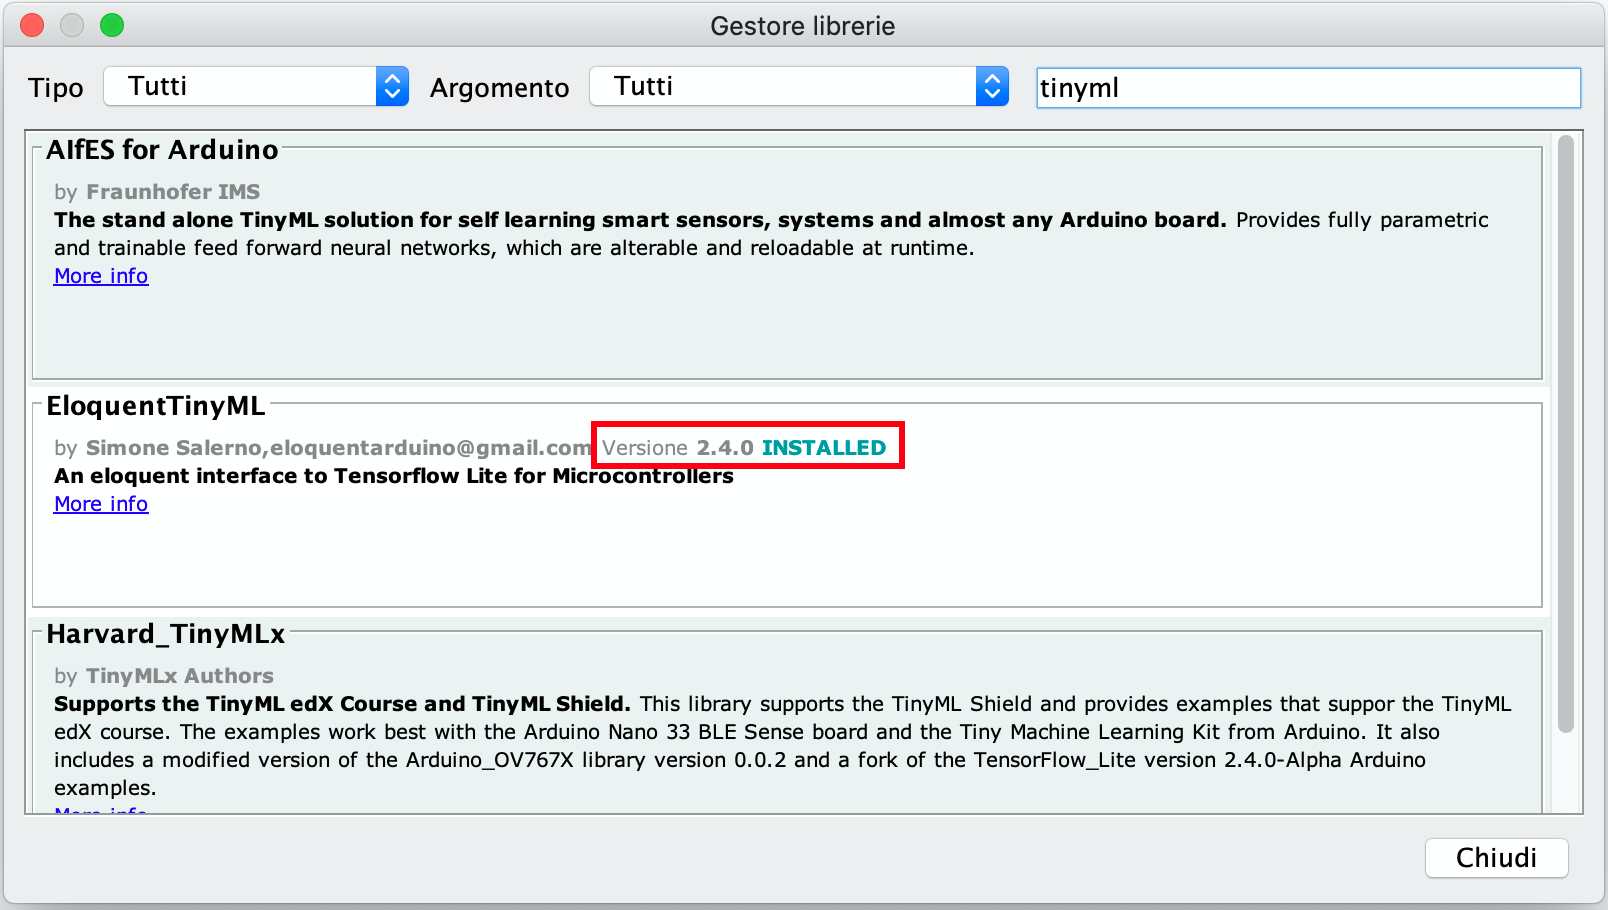
It wraps all the boilerplate code that you usually see in tutorials and gives you a minimal, clean API to run the models.
// how using EloquentTinyML looks like

#include <EloquentTinyML.h>
#include <eloquent_tinyml/tensorflow.h>

// sine_model.h contains the array you exported from Python with xxd or tinymlgen
#include "sine_model.h"

#define N_INPUTS 1
#define N_OUTPUTS 1
#define TENSOR_ARENA_SIZE 2*1024

Eloquent::TinyML::TensorFlow::TensorFlow<N_INPUTS, N_OUTPUTS, TENSOR_ARENA_SIZE> tf;

void setup() {
    Serial.begin(115200);
    delay(4000);
    tf.begin(sine_model);
}

void loop() {
    for (float i = 0; i < 10; i++) {
        // pick x from 0 to PI
        float x = 3.14 * i / 10;
        float y = sin(x);
        float input[1] = { x };
        float predicted = tf.predict(input);

        Serial.print("sin(");
        Serial.print(x);
        Serial.print(") = ");
        Serial.print(y);
        Serial.print("\t predicted: ");
        Serial.println(predicted);
    }

    delay(1000);
}
Step 2/3: Configure the camera
EloquentTinyML both supports ARM Cortex-M (Arduino Portenta, Arduino Nano variants, STM32) boards and ESP32 boards.
I tested person detection on two different boards: Arduino Portenta + Vision Shield and M5Stack fisheye camera.
* no affiliate links
Every other camera will have its own way to be configured and grab a frame, so you may need to write some custom code if you own a different model.
I will show you how easy it can be for these two models.
// file PortentaVision.h

#include "camera.h"

CameraClass cam;
uint8_t frame[320*240];

/**
 * Configure camera
 */
void initCamera() {
  cam.begin(CAMERA_R320x240, 30);
}

/**
 * Capture frame from Vision shield
 */
uint8_t* captureFrame() {
  cam.grab(frame);

  return frame;
}
// file ESP32Camera.h
#define CAMERA_MODEL_M5STACK_WIDE
#include <EloquentVision.h>
Eloquent::Vision::ESP32Camera camera;
camera_fb_t *frame;
/**
* Configure camera
*/
void initCamera() {
camera.begin(FRAMESIZE_QVGA, PIXFORMAT_GRAYSCALE, 20000000);
}
/**
* Capture frame from ESP32 camera
*/
uint8_t* captureFrame() {
frame = camera.capture();
return frame->buf;
}Step 3/3: Run Person Detection Neural Network
As promised, you will only need 3 lines of code to run person detection at the bare minimum:
- Instantiate the detector
- Configure the detector
- Feed an image to the detector and get response back
The following is a working sketch that counts 60 lines of code including comments, debug messages and security checks!
(as a reference, the official sketch requires 120 lines of code and 10+ external files!)
#include <EloquentTinyML.h>
#include <eloquent_tinyml/tensorflow/person_detection.h>
#if defined(ESP32)
#include "ESP32Camera.h"
#else
#include "PortentaVision.h"
#endif
const uint16_t imageWidth = 320;
const uint16_t imageHeight = 240;
Eloquent::TinyML::TensorFlow::PersonDetection<imageWidth, imageHeight> detector;
void setup() {
Serial.begin(115200);
delay(5000);
initCamera();
// configure a threshold for "robust" person detection
// if no threshold is set, "person" would be detected everytime
// person_score > not_person_score, even if just by 1
// by trial and error, considering that scores range from 0 to 255,
// a threshold of 190-200 dramatically reduces the number of false positives
detector.setDetectionAbsoluteThreshold(190);
detector.begin();
// abort if an error occurred
if (!detector.isOk()) {
Serial.print("Setup error: ");
Serial.println(detector.getErrorMessage());
while (true) delay(1000);
}
}
void loop() {
uint8_t *frame = captureFrame();
bool isPersonInFrame = detector.detectPerson(frame);
if (!detector.isOk()) {
Serial.print("Loop error: ");
Serial.println(detector.getErrorMessage());
delay(10000);
return;
}
Serial.println(isPersonInFrame ? "Person detected" : "No person detected");
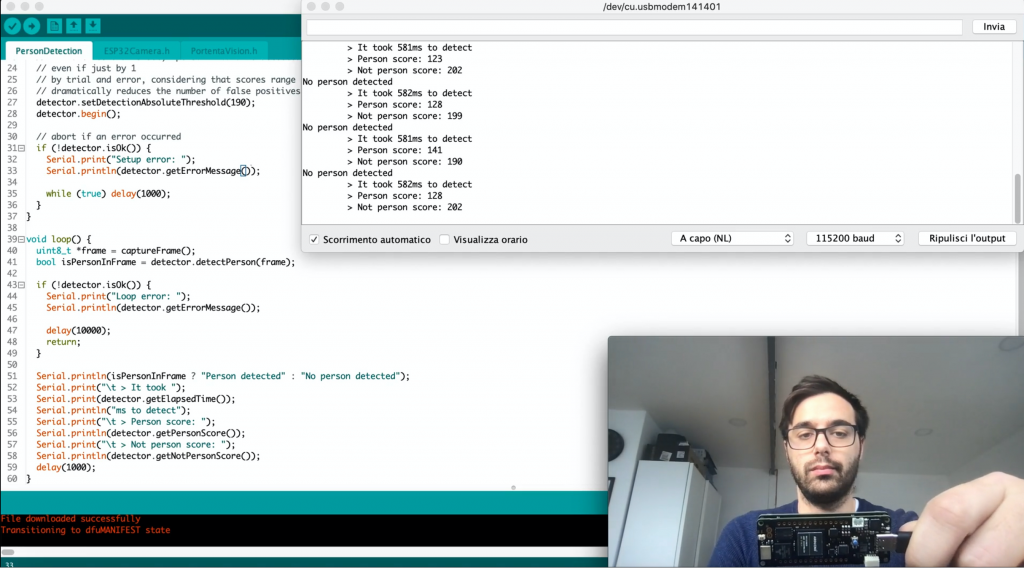
Serial.print("\t > It took ");
Serial.print(detector.getElapsedTime());
Serial.println("ms to detect");
Serial.print("\t > Person score: ");
Serial.println(detector.getPersonScore());
Serial.print("\t > Not person score: ");
Serial.println(detector.getNotPersonScore());
delay(1000);
}That's it!
Hopefully, you can clearly see what's happening here without being distracted by the inner workings of the library.
When you can understand the base sketch, you can easily customize the application logic to take action when a person is detected.
As promised: No non-sense, stright-to-the-point, 100% customizable.
Here's a short video of me testing the sketch on an Arduino Portenta Vision Shield.
How long does it take to detect a person?
As you can see from the live video, on the Arduino Portenta inference takes < 600 ms. The Esp32 is 10x slower, at ~6 seconds to classify a single frame.
What can I do with this?
Person detection is quite a general purpose feature to have in your tool belt.
You can create a smart door bell that activates when it recognizes a person in front of it.
You can create a smart relay that turns the lights on when you're back at home.
You can count the number of people passing in front of your camera.
Whatever it is, this base sketch will accomodate all your use cases!
Where can I learn more?
If you want to learn more on the EloquentTinyML library and its applications, I send a newsletter twice a month with insights and advanced project ideas. Subscribe to start learning!
How can I help?
If you're a developer, you can submit improvements and pull requests on Github
If you're not a developer and you want to see more of this contents, consider buying me a coffe.
It takes hours to write such a content and I do this on my spare time, so you'll find 1-2 posts per month on this blog: if you think I should do it more often, consider showing me your support concretely with a tip. As low as 5 USD will make the difference!