
Do you have an ESP32 camera?
Want to do image recognition directly on your ESP32, without a PC?
In this post we'll look into a very basic image recognition task: distinguish apples from oranges with machine learning.
Image recognition is a very hot topic these days in the AI/ML landscape. Convolutional Neural Networks really shines in this task and can achieve almost perfect accuracy on many scenarios.
Sadly, you can't run CNN on your ESP32, they're just too large for a microcontroller.
Since in this series about Machine Learning on Microcontrollers we're exploring the potential of Support Vector Machines (SVMs) at solving different classification tasks, we'll take a look into image classification too.
Table of contents
What we're going to do
In a previous post about color identification with Machine learning, we used an Arduino to detect the object we were pointing at with a color sensor (TCS3200) by its color: if we detected yellow, for example, we knew we had a banana in front of us.
Of course such a process is not object recognition at all: yellow may be a banane, or a lemon, or an apple.
Object inference, in that case, works only if you have exactly one object for a given color.
The objective of this post, instead, is to investigate if we can use the MicroML framework to do simple image recognition on the images from an ESP32 camera.
This is much more similar to the tasks you do on your PC with CNN or any other form of NN you are comfortable with. Sure, we will still apply some restrictions to fit the problem on a microcontroller, but this is a huge step forward compared to the simple color identification.
As any beginning machine learning project about image classification worth of respect, our task will be to distinguish an orange from an apple.
Features definition
I have to admit that I rarely use NN, so I may be wrong here, but from the examples I read online it looks to me that features engineering is not a fundamental task with NN.
Those few times I used CNN, I always used the whole image as input, as-is. I didn't extracted any feature from them (e.g. color histogram): the CNN worked perfectly fine with raw images.
I don't think this will work best with SVM, but in this first post we're starting as simple as possible, so we'll be using the RGB components of the image as our features. In a future post, we'll introduce additional features to try to improve our results.
I said we're using the RGB components of the image. But not all of them.
Even at the lowest resolution of 160x120 pixels, a raw RGB image from the camera would generate 160x120x3 = 57600 features: way too much.
We need to reduce this number to the bare minimum.
How much pixels do you think are necessary to get reasonable results in this task of classifying apples from oranges?
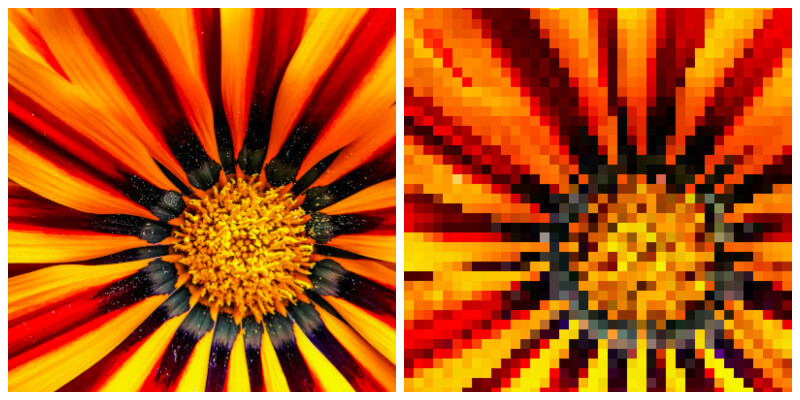
You would be surprised to know that I got 90% accuracy with an RGB image of 8x6!
![]()
![]()
Yes, that's all we really need to do a good enough classification.
You can distinguish apples from oranges on ESP32 with 8x6 pixels only! Click To TweetOf course this is a tradeoff: you can't expect to achieve 99% accuracy while mantaining the model size small enough to fit on a microcontroller. 90% is an acceptable accuracy for me in this context.
You have to keep in mind, moreover, that the features vector size grows quadratically with the image size (if you keep the aspect ratio). A raw RGB image of 8x6 generates 144 features: an image of 16x12 generates 576 features. This was already causing random crashes on my ESP32.
So we'll stick to 8x6 images.
Now, how do you compact a 160x120 image to 8x6? With downsampling.
This is the same tecnique we've used in the post about motion detection on ESP32: we define a block size and average all the pixels inside the block to get a single value (you can refer to that post for more details).
This time, though, we're working with RGB images instead of grayscale, so we'll repeat the exact same process 3 times, one for each channel.
This is the code excerpt that does the downsampling.
uint16_t rgb_frame[HEIGHT / BLOCK_SIZE][WIDTH / BLOCK_SIZE][3] = { 0 };

void grab_image() {
    for (size_t i = 0; i < len; i += 2) {
        // get r, g, b from the buffer
        // see later

        const size_t j = i / 2;
        // transform x, y in the original image to x, y in the downsampled image
        // by dividing by BLOCK_SIZE
        const uint16_t x = j % WIDTH;
        const uint16_t y = floor(j / WIDTH);
        const uint8_t block_x = floor(x / BLOCK_SIZE);
        const uint8_t block_y = floor(y / BLOCK_SIZE);

        // average pixels in block (accumulate)
        rgb_frame[block_y][block_x][0] += r;
        rgb_frame[block_y][block_x][1] += g;
        rgb_frame[block_y][block_x][2] += b;
    }
}Extracting RGB components
The ESP32 camera can store the image in different formats (of our interest — there are a couple more available):
- grayscale: no color information, just the intensity is stored. The buffer has size HEIGHT*WIDTH
- RGB565: stores each RGB pixel in two bytes, with 5 bit for red, 6 for green and 5 for blue. The buffer has size HEIGHT * WIDTH * 2
- JPEG: encodes (in hardware?) the image to jpeg. The buffer has a variable length, based on the encoding results
For our purpose, we'll use the RGB565 format and extract the 3 components from the 2 bytes with the following code.

config.pixel_format = PIXFORMAT_RGB565;

for (size_t i = 0; i < len; i += 2) {
    const uint8_t high = buf[i];
    const uint8_t low  = buf[i+1];
    const uint16_t pixel = (high << 8) | low;

    const uint8_t r = (pixel & 0b1111100000000000) >> 11;
    const uint8_t g = (pixel & 0b0000011111100000) >> 5;
    const uint8_t b = (pixel & 0b0000000000011111);
}
Record samples image
Now that we can grab the images from the camera, we'll need to take a few samples of each object we want to racognize.
Before doing so, we'll linearize the image matrix to a 1-dimensional vector, because that's what our prediction function expects.
#define H (HEIGHT / BLOCK_SIZE)
#define W (WIDTH / BLOCK_SIZE)

void linearize_features() {
  size_t i = 0;
  double features[H*W*3] = {0};

  for (int y = 0; y < H; y++) {
    for (int x = 0; x < W; x++) {
      features[i++] = rgb_frame[y][x][0];
      features[i++] = rgb_frame[y][x][1];
      features[i++] = rgb_frame[y][x][2];
    }
  }

  // print to serial
  for (size_t i = 0; i < H*W*3; i++) {
    Serial.print(features[i]);
    Serial.print('\t');
  }

  Serial.println();
}
Now you can setup your acquisition environment and take the samples: 15-20 of each object will do the job.
You need to be very accurate during this phase if you want to achieve good results.
I suggest you immobilize your camera with tape to a flat surface or use some kind of photographic easel.
Training the classifier
To train the classifier, save the features for each object in a file, one features vector per line. Then follow the steps on how to train a ML classifier for Arduino to get the exported model.
You can experiment with different classifier configurations.
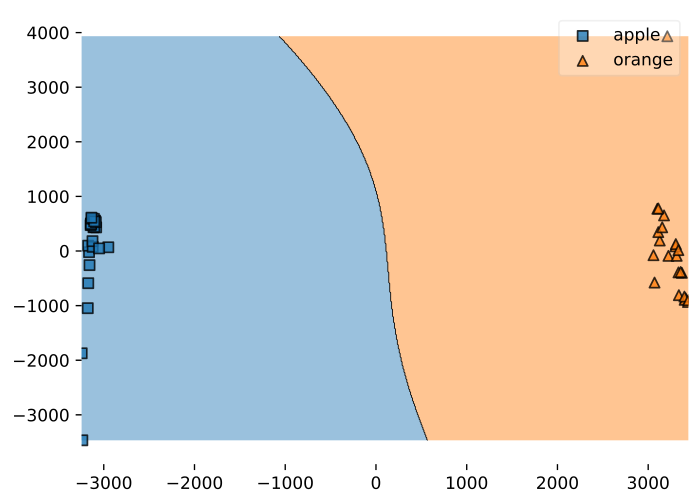
My features were well distinguishable, so I had great results (100% accuracy) with any kernel (even linear).
One odd thing happened with the RBF kernel: I had to use an extremely low gamma value (0.0000001). Does anyone can explain me why? I usually go with a default value of 0.001.
The model produced 13 support vectors.
I did no features scaling: you could try it if classifying more than 2 classes and having poor results.
Real world example
If you followed all the steps above, you should now have a model capable of detecting if your camera is shotting an apple or an orange, as you can see in the following video.
The little white object you see at the bottom of the image is the camera, taped to the desk.
Did you think it was possible to do simple image classification on your ESP32?
Troubleshooting
It can happen that when running micromlgen.port(clf) you get a TemplateNotFound error. To solve the problem, first of all uninstall micromlgen.
pip uninstall micromlgenThen head to Github, download the package as zip and extract the micromlgen folder into your project.
Disclaimer
This is not full-fledged object recognition: it can't label objects while you walk as Tensorflow can do, for example.
You have to carefully craft your setup and be as consistent as possible between training and inferencing.
Still, I think this is a fun proof-of-concept that can have useful applications in simple scenarios where you can live with a fixed camera and don't want to use a full Raspberry Pi.
In the next weeks I settled to finally try TensorFlow Lite for Microcontrollers on my ESP32, so I'll try to do a comparison between them and this example and report my results.
Now that you can do image classification on your ESP32, can you think of a use case you will be able to apply this code to?
Let me know in the comments, we could even try realize it together if you need some help.
Check the full project code on Github