
In this Arduno Machine learning project we're going to use an RGB sensor to identify objects based on their color.
This is a remake of the project found on the Tensorflow blog. We're going to use a lot less powerful chip in this tutorial, tough: an Arduino Nano (old generation), equipped with 32 kb of flash and only 2 kb of RAM.
Table of contents
1. Features definition
We're going to use the RGB components of a color sensor (TCS3200 in my case) to infer which object we're pointing it at. This means our features are going to be of 3-dimensional, which leads to a really simple model with very high accuracy.
You can do color identification on Arduino using Machine learning without Neural Networks #Arduino #microml #ml #tinyml #MachineLearning #ai #svm Click To Tweet2. Record sample data
We don't need any processing to get from the sensor readings to the feature vector, so the code will be straight-forward: read each component from the sensor and assign it to the features array. This part will vary based on the specific chip you have: I'll report the code for a TCS 230/3200.
#define S2 2
#define S3 3
#define sensorOut 4

double features[3];

void setup() {
  Serial.begin(115200);
  pinMode(S2, OUTPUT);
  pinMode(S3, OUTPUT);
  pinMode(sensorOut, INPUT);
}

void loop() {
  readRGB();
  printFeatures();
  delay(100);
}

int readComponent(bool s2, bool s3) {
  delay(10);
  digitalWrite(S2, s2);
  digitalWrite(S3, s3);

  return pulseIn(sensorOut, LOW);
}

void readRGB() {
  features[0] = readComponent(LOW, LOW);
  features[1] = readComponent(HIGH, HIGH);
  features[2] = readComponent(LOW, HIGH);
}
void printFeatures() {
    const uint16_t numFeatures = sizeof(features) / sizeof(float);

    for (int i = 0; i < numFeatures; i++) {
        Serial.print(features[i]);
        Serial.print(i == numFeatures - 1 ? 'n' : ',');
    }
}
Open the Serial monitor and put some colored objects in front of the sensor: move the object a bit and rotate it, so the samples will include different shades of the color.
Save the recordings for each color in a file named after the color, so you will get meaningful results later on.
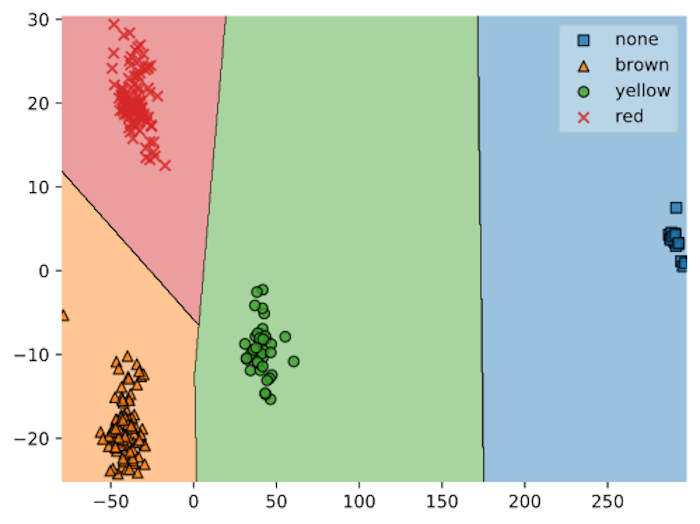
If you do a good job, you should end with distinguible features, as show in the contour plot below.
3. Train and export the classifier
For a detailed guide refer to the tutorial
from sklearn.ensemble import RandomForestClassifier
from micromlgen import port

# put your samples in the dataset folder
# one class per file
# one feature vector per line, in CSV format
features, classmap = load_features('dataset/')
X, y = features[:, :-1], features[:, -1]
classifier = RandomForestClassifier(n_estimators=30, max_depth=10).fit(X, y)
c_code = port(classifier, classmap=classmap)
print(c_code)
At this point you have to copy the printed code and import it in your Arduino project, in a file called model.h.
4. Run the inference
#include model.h

void loop() {
  readRGB();
  Serial.println(classIdxToName(predict(features)));
  delay(1000);
}
Put some colored object in front of the sensor and see the identified object name printed on the serial monitor.
Given the simplicity of the task, you should easily achieve near 100% accuracy for different colors (I had some troubles distinguishing orange from yellow because of the bad illumination). Just be sure to replicate the exact same setup both during training and classification.
That’s it: you deployed machine learning in 2 Kb!
Project figures
On my machine, the sketch targeted at the Arduino Nano (old generation) requires 5570 bytes (18%) of program space and 266 bytes (12%) of RAM. This means you could actually run machine learning in even less space than what the Arduino Nano provides. So, the answer to the question Can I run machine learning on Arduino? is definetly YES.
Did you find this tutorial useful? Was is it easy to follow or did I miss something? Let me know in the comments so I can keep improving the blog.
Check the full project code on Github