
Fourier Transform is probably the most well known algorithm for feature extraction from time-dependent data (in particular speech data), where frequency holds a great deal of information. Sadly, computing the transform over the whole spectrum of the signal still requires O(NlogN) with the best implementation (FFT - Fast Fourier Transform); we would like to achieve faster computation on our microcontrollers.
In this post I propose a partial, naive linear-time implementation of the Fourier Transform you can use to extract features from your data for Machine Learning models.
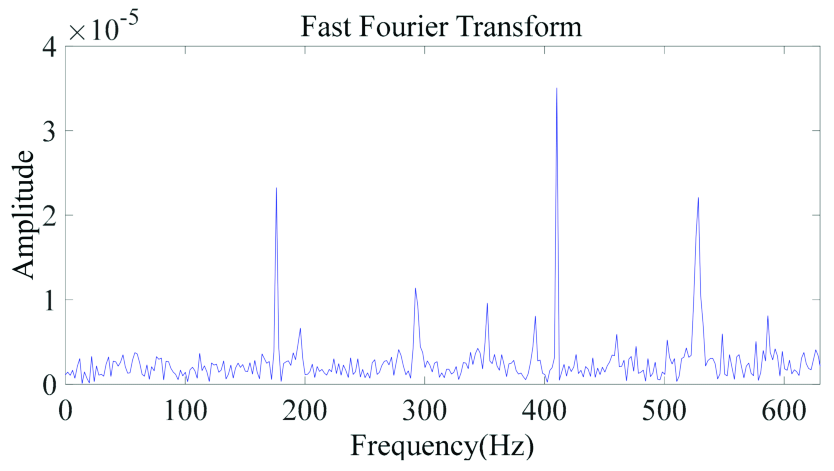
Table of contents
DISCLAIMER
The contents of this post represent my own knowledge and are not supported by any academic work (as far as I know). It may really be the case that the findings of my work don't apply to your own projects; yet, I think this idea can turn useful in solving certain kind of problems.
Training-aware FFT
Fourier transform is used to describe a signal over its entire frequency range. This is useful in a number of applications, but here we're focused on the FT for the sole purpose of extracting features to be used with Machine learning models.
For this reason, we don't actually need a full description of the input signal: we're only interested in extracting some kind of signature that a ML model can use to distinguish among the different classes. Noticing that in a signal spectrum most frequencies have a low magnitude (as you can see in the picture above), the idea to only keep the most important frequencies came to my mind as a mean to speed up the computation on resource constrained microcontrollers.
I was thinking to a kind of PCA (Principal Component Analysis), but using FFT spectrum as features.
Since we will have a training set with the raw signals, we would like to select the most prominent frequencies among all the samples and apply the computation only on those: even using the naive implementation of FFT, this will yield a linear-time implementation.
Accuracy comparison
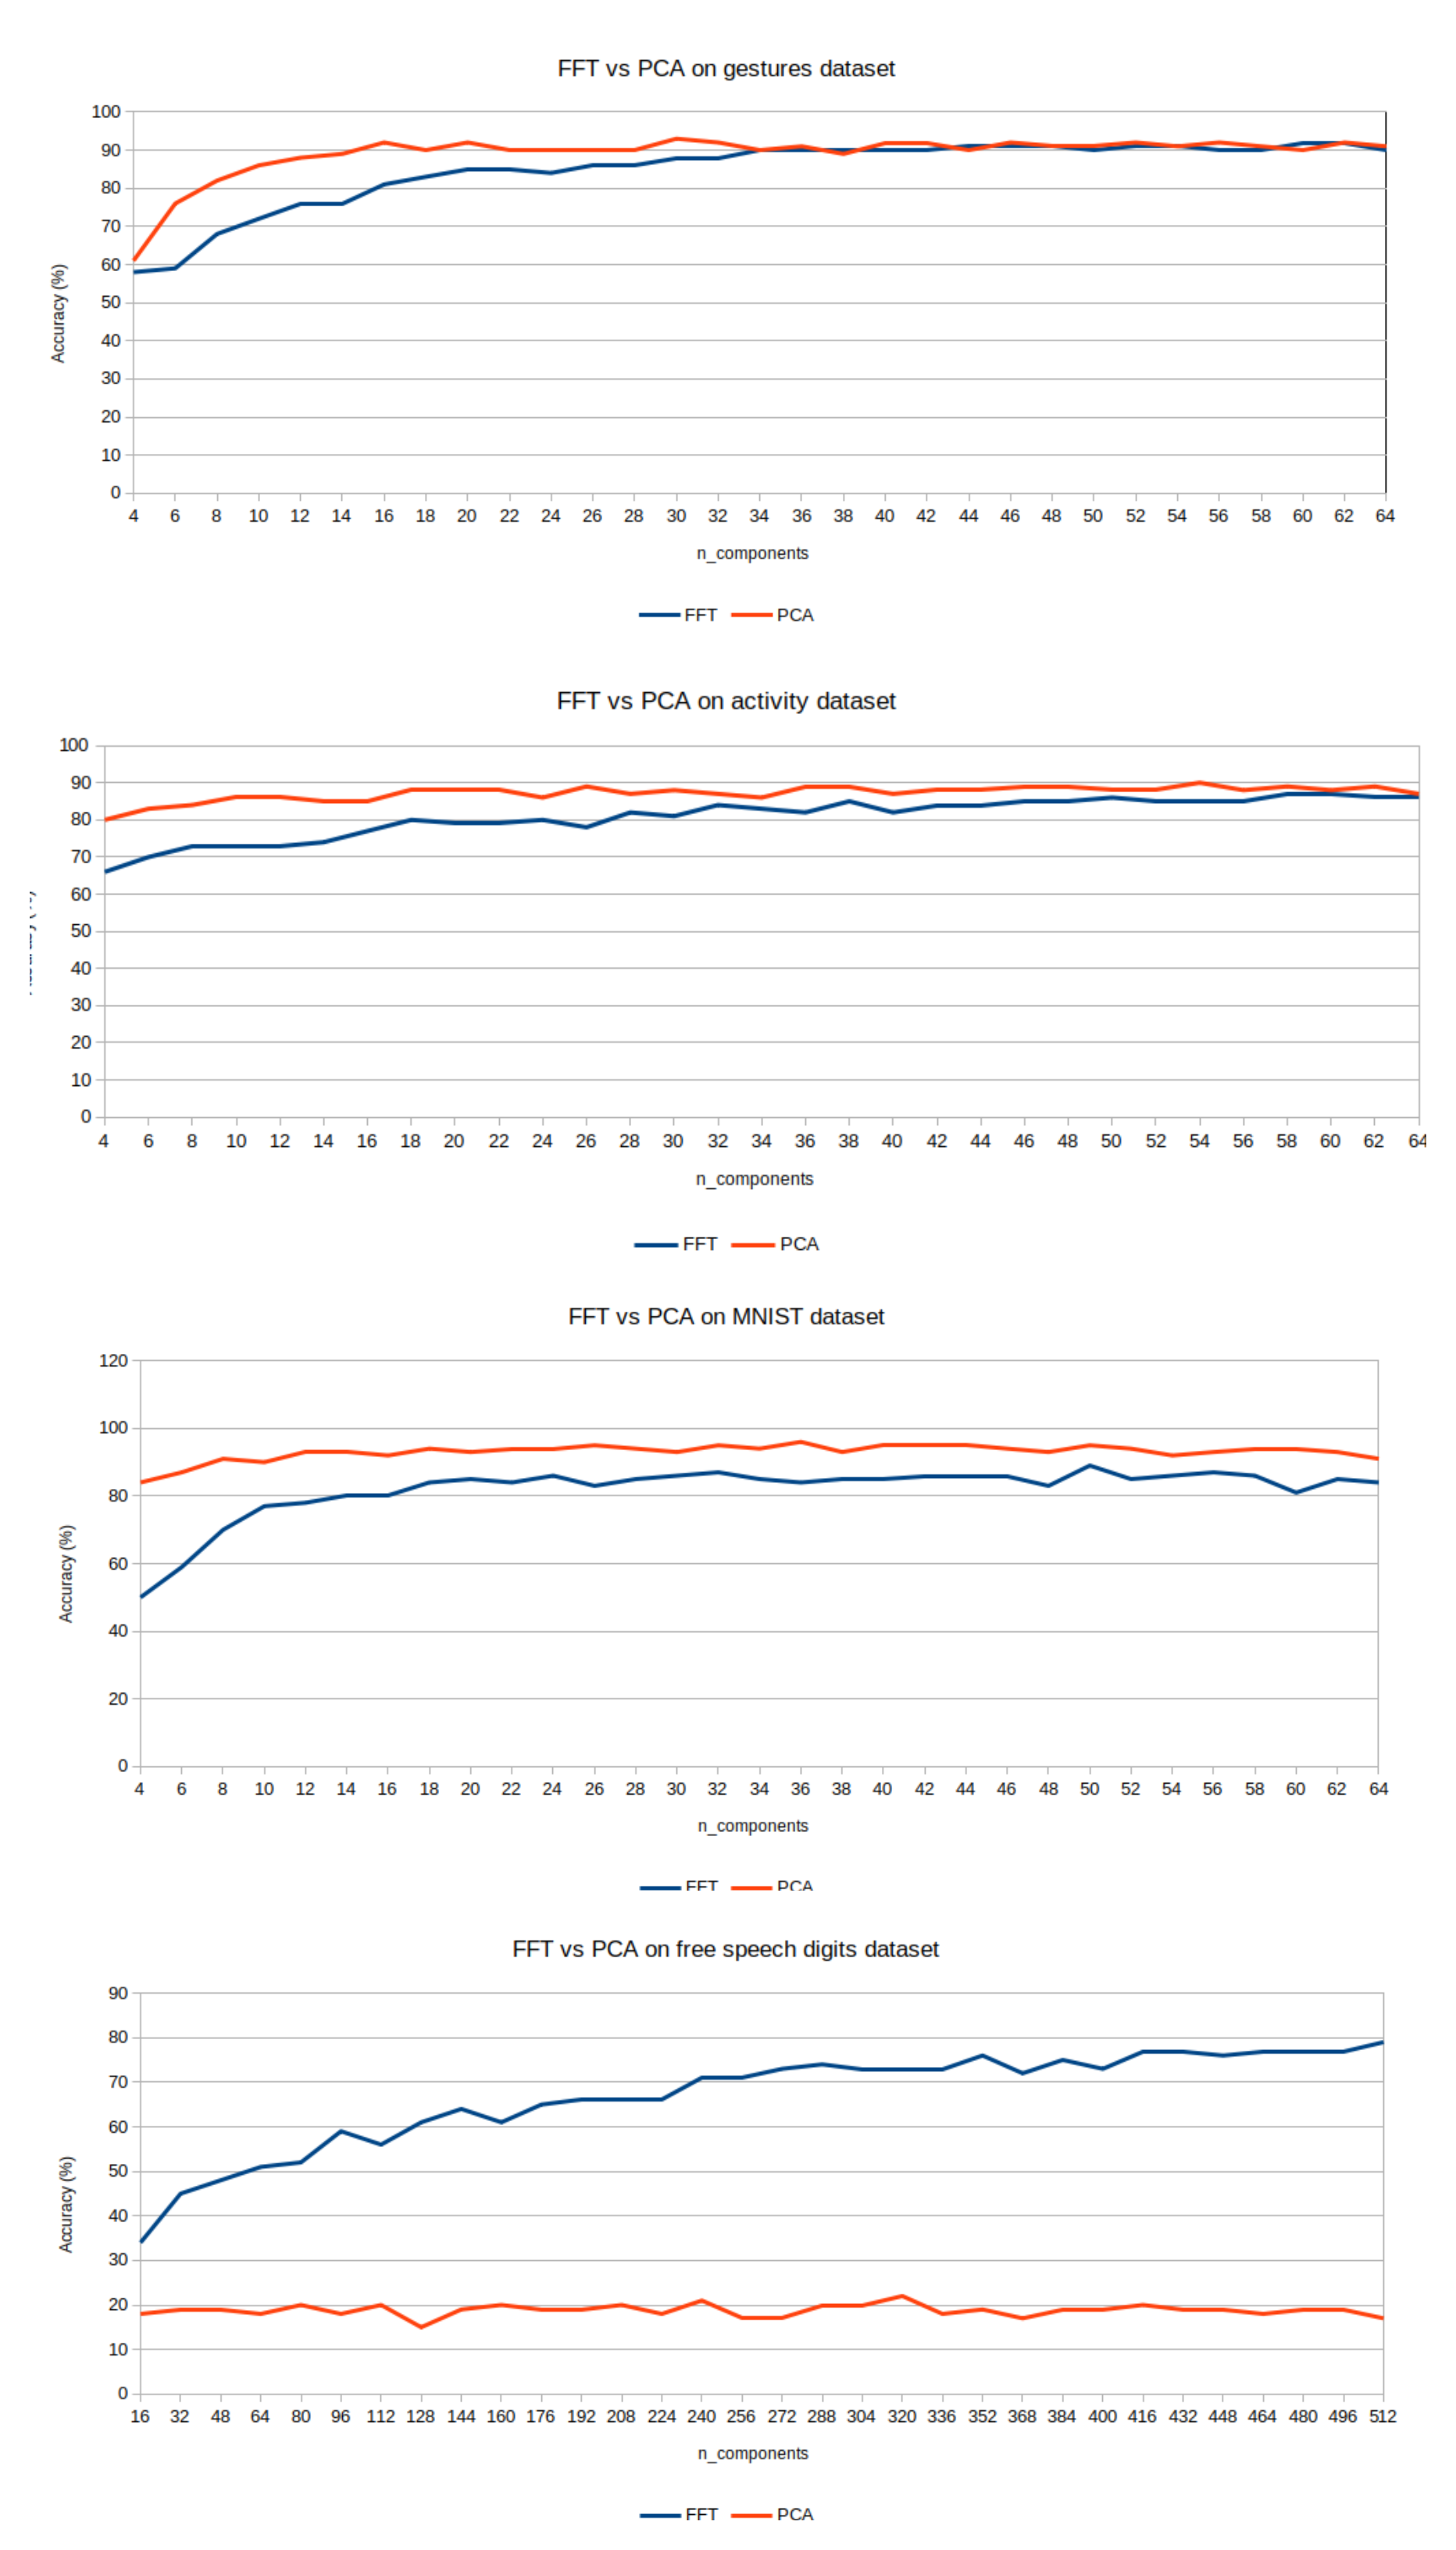
How does this Principal FFT compare to, let's say, PCA as a dimensionality reduction algorithm w.r.t model accuracy? Let's see the numbers!
Download the Principal FFT benchmark spreadsheet
I couldn't find many examples of the kind of datasets I wished to test, but in the image you can see different types of data:
- human activity classification from smartphone data
- gesture classification by IMU data
- MNIST handwritten digits image data
- free speech audio data
We can note a couple findings:
- Principal FFT is almost on par with PCA after a certain number of components
- PrincipalFFT definitely leaves PCA behind on audio data
From even this simple analysis you should be convinced that Principal FFT can be (under certain cases) a fast, performant features extractor for your projects that involve time-dependant data.
How to use Principal FFT in Python
I created a Python package to use Principal FFT, called principal-fft.
pip install principal-fftThe class follows the Transformer API from scikit-learn, so it has fit and transform methods.
from principalfft import PrincipalFFT
from sklearn.model_selection import train_test_split
from sklearn.datasets import load_digits
from sklearn.ensemble import RandomForestClassifier

mnist = load_digits()
X, y = mnist.data, mnist.target
Xfft = PrincipalFFT(n_components=10).fit_transform(X)

X_train, X_test, y_train, y_test = train_test_split(X, y, test_size=0.3)
Xfft_train, Xfft_test, y_train, y_test = train_test_split(Xfft, y, test_size=0.3)

clf = RandomForestClassifier(50, min_samples_leaf=5).fit(X_train, y_train)
print("Raw score", clf.score(X_test, y_test))

clf = RandomForestClassifier(50, min_samples_leaf=5).fit(Xfft_train, y_train)
print("FFT score", clf.score(Xfft_test, y_test))
My results are 0.09 for raw data and 0.78 for FFT transformed: quite a big difference!
As with any dimensionality reduction, n_components is an hyperparameter you have to tune for your specific project: from my experiments, you shouldn't go lower than 8 to achieve a reasonable accuracy.
How to use Principal FFT in C
So, now that we tested our Principal FFT transformer in Python and achieved good results, how do we use it on our microcontroller? Of course with the micromlgen porter: it is now (version 1.1.9) able to port PrincipalFFT objects to plain C.
pip install micromlgen==1.1.9What does the C code look like?
void principalFFT(float *features, float *fft) {
    // apply principal FFT (naive implementation for the top 10 frequencies only)
    const int topFrequencies[] = { 0, 8, 17, 16, 1, 9, 2, 7, 15, 6 };

    for (int i = 0; i < 10; i++) {
        const int k = topFrequencies[i];
        const float harmonic = 0.09817477042468103 * k;
        float re = 0;
        float im = 0;

        // optimized case
        if (k == 0) {
            for (int n = 0; n < 64; n++) {
                re += features[n];
            }
        }

        else {
            for (int n = 0; n < 64; n++) {
                const float harmonic_n = harmonic * n;
                const float cos_n = cos(harmonic_n);
                const float sin_n = sin(harmonic_n);
                re += features[n] * cos_n;
                im -= features[n] * sin_n;
            }
        }

        fft[i] = sqrt(re * re + im * im);
    }
}
This is the most direct porting available.
In the Benchmarks section, we'll see how this implementation can be speed-up with alternative implementations.
Benchmarking
The following table reports the benchmark on the MNIST dataset (64 features) with 10 principal FFT components vs various tecniques to decrease the computation time at the expense of memory usage.
| Algorithm | Flash (Kb) | Execution time (micros) |
|---|---|---|
| None | 137420 | - |
| arduinoFFT library | 147812 | 3200 |
| principalFFT | 151404 | 4400 |
| principalFFT w/ cos+sin LUT | 152124 | 900 |
| principalFFT w/ cos LUT + sin sign LUT | 150220 | 1250 |
*all the benchmarks were run on the Arduino 33 Nano BLE Sense
Some thoughts:
principalFFT w/ cos+sin LUTmeans I pre-compute the values ofsinandcosat compile time, so there's no computation on the board; of course these lookup tables will eat some memoryprincipalFFT w/ cos LUT + sin sign LUTmeans I pre-compute thecosvalues only and computesinusingsqrt(1 - cos(x)^2); it adds some microseconds to the computation, but requires less memoryarduinoFFT libraryis faster thanprincipalFFTin the execution time and requires less memory, even ifprincipalFFTis only computing 10 frequencies: I need to investigate how it can achieve such performances
You can activate the LUT functionality with:
from micromlgen import port
from principalfft import PrincipalFFT

fft = PrincipalFFT(n_components=10).fit(X)

# cos lookup, sin computed
port(fft, lookup_cos=True)

# cos + sin lookup
port(fft, lookup_cos=True, lookup_sin=True)
Here's how the C code looks like with LUT.
void principalFFT(float *features, float *fft) {
    // apply principal FFT (naive implementation for the top N frequencies only)
    const int topFrequencies[] = { 0, 8, 17, 16, 1, 9, 2, 7, 15, 6 };
    const float cosLUT[10][64] = {
        {  1.0,  1.0,  1.0,  1.0,  1.0,  1.0,  1.0,  1.0,  1.0,  1.0,  1.0,  1.0,  1.0,  1.0,  1.0,  1.0,  1.0,  1.0,  1.0,  1.0,  1.0,  1.0,  1.0,  1.0,  1.0,  1.0,  1.0,  1.0,  1.0,  1.0,  1.0,  1.0,  1.0,  1.0,  1.0,  1.0,  1.0,  1.0,  1.0,  1.0,  1.0,  1.0,  1.0,  1.0,  1.0,  1.0,  1.0,  1.0,  1.0,  1.0,  1.0,  1.0,  1.0,  1.0,  1.0,  1.0,  1.0,  1.0,  1.0,  1.0,  1.0,  1.0,  1.0,  1.0},
        {  1.0,  0.7071,  6.1232e-17,  -0.7071,  -1.0,  -0.7071,  -1.8369e-16,  0.7071,  1.0,  0.7071,  3.0616e-16,  -0.7071,  -1.0,  -0.7071,  -4.2862e-16,  0.7071,  1.0,  0.7071,  5.5109e-16,  -0.7071,  -1.0,  -0.7071,  -2.4499e-15,  0.7071,  1.0,  0.7071,  -9.8033e-16,  -0.7071,  -1.0,  -0.7071,  -2.6948e-15,  0.7071,  1.0,  0.7071,  -7.3540e-16,  -0.7071,  -1.0,  -0.7071,  -2.9397e-15,  0.7071,  1.0,  0.7071,  -4.9047e-16,  -0.7071,  -1.0,  -0.7071,  -3.1847e-15,  0.7071,  1.0,  0.7071,  -2.4554e-16,  -0.7071,  -1.0,  -0.7071,  -3.4296e-15,  0.7071,  1.0,  0.7071,  -6.1898e-19,  -0.7071,  -1.0,  -0.7071,  -3.6745e-15,  0.7071},   ... };
    const bool sinLUT[10][64] = {
        {  false,  false,  false,  false,  false,  false,  false,  false,  false,  false,  false,  false,  false,  false,  false,  false,  false,  false,  false,  false,  false,  false,  false,  false,  false,  false,  false,  false,  false,  false,  false,  false,  false,  false,  false,  false,  false,  false,  false,  false,  false,  false,  false,  false,  false,  false,  false,  false,  false,  false,  false,  false,  false,  false,  false,  false,  false,  false,  false,  false,  false,  false,  false,  false},
        {  false,  true,  true,  true,  true,  false,  false,  false,  false,  true,  true,  true,  true,  false,  false,  false,  false,  true,  true,  true,  true,  false,  false,  false,  false,  true,  true,  true,  true,  false,  false,  false,  false,  true,  true,  true,  true,  false,  false,  false,  false,  true,  true,  true,  true,  false,  false,  false,  false,  true,  true,  true,  false,  false,  false,  false,  false,  true,  true,  true,  true,  false,  false,  false},  ...};

    for (int i = 0; i < 10; i++) {
        const int k = topFrequencies[i];
        const float harmonic = 0.09817477042468103 * k;
        float re = 0;
        float im = 0;
        // optimized case
        if (k == 0) {
            for (int n = 0; n < 64; n++) {
                re += features[n];
            }
        }

        else {
            for (int n = 0; n < 64; n++) {
                const float cos_n = cosLUT[i][n];
                const float sin_n = sinLUT[i][n] ? sqrt(1 - cos_n * cos_n) : -sqrt(1 - cos_n * cos_n);
                re += features[n] * cos_n;
                im -= features[n] * sin_n;
            }
        }

        fft[i] = sqrt(re * re + im * im);
    }
}
Troubleshooting
It can happen that when running micromlgen.port(clf) you get a TemplateNotFound error. To solve the problem, first of all uninstall micromlgen.
pip uninstall micromlgenThen head to Github, download the package as zip and extract the micromlgen folder into your project.
This post required much work to be produced, so I hope I didn't forgot anything and you found these information useful.
As always, there's a Github repo with all the code of this post.