
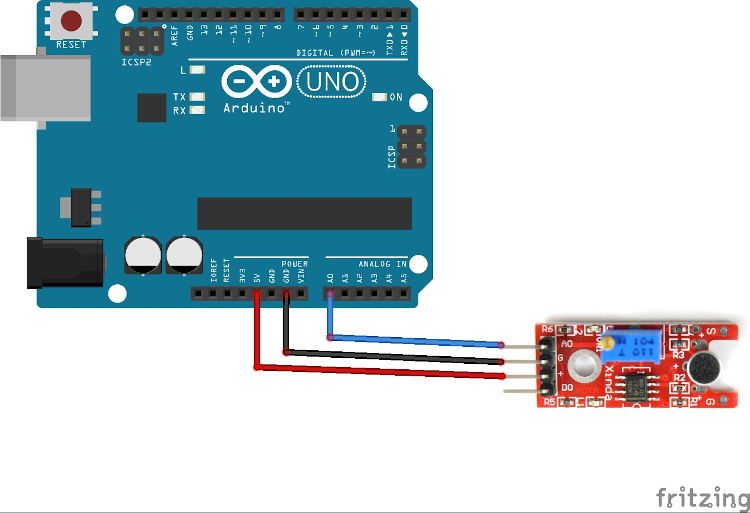
In this Arduno Machine learning tutorial we're going to use a microphone to identify the word you speak.
This is going to run on an Arduino Nano (old generation), equipped with 32 kb of flash and only 2 kb of RAM.

In this project the features are going to be the Fast Fourier Transform of 50 analog readings from a microphone, taken starting from when a loud sound is detected, sampled at intervals of 5 millis.
Table of contents
1. Features definition
The microphone we're going to use is a super simple device: it produces an analog signal (0-1024) based on the sound it detects.
When working with audio you almost always don't want to use raw readings, since they're hardly useful. Instead you often go with Fourier Transform, which extracts the frequency information from a time signal. That's going to become our features vector: let's see how in the next step.
2. Record sample data
First of all, we start with raw audio data. The following plot is me saying random words.
#define MIC A0
#define INTERVAL 5

void setup() {
    Serial.begin(115200);
    pinMode(MIC, INPUT);
}

void loop() {
    Serial.println(analogRead(MIC));
    delay(INTERVAL);
}
2.1 Translate the raw values
For the Fourier Transform to work, we need to provide as input an array of values both positive and negative. analogRead() is returning only positive values, tough, so we need to translate them.
int16_t readMic() {
    // this translated the analog value to a proper interval
    return  (analogRead(MIC) - 512) >> 2;
}
2.2 Detect sound
As in the tutorial about gesture classification, we'll start recording the features when a word is beginning to be pronounced. Also in this project we'll use a threshold to detect the start of a word.
To do this, we first record a "background" sound level, that is the value produced by the sensor when we're not talking at all.
float backgroundSound = 0;

void setup() {
    Serial.begin(115200);
    pinMode(MIC, INPUT);
    calibrate();
}

void calibrate() {
    for (int i = 0; i < 200; i++)
        backgroundSound += readMic();

    backgroundSound /= 200;

    Serial.print("Background sound level is ");
    Serial.println(backgroundSound);
}
At this point we can check for the starting of a word when the detected sound level exceeds tha background one by a given threshold.
// adjust as per your need
// it will depend on the sensitivity of you microphone
#define SOUND_THRESHOLD 3

void loop() {
    if (!soundDetected()) {
        delay(10);
        return;
    }
}

bool soundDetected() {
    return abs(read() - backgroundSound) >= SOUND_THRESHOLD;
}
2.3 Record the words
As for the gestures, we'll record a fixed number of readings at a fixed interval.
Here a tradeoff arises: you want to have a decent number of readings to be able to accurately describe the words you want to classify, but not too much otherwise your model is going to be too large to fit in your board.
I made some experiments, and I got good results with 32 samples at 5 millis interval, which covers ~150 ms of speech.
#define NUM_SAMPLES 32
#define INTERVAL 5

float features[NUM_SAMPLES];
double featuresForFFT[NUM_SAMPLES];

void loop() {
    if (!soundDetected()) {
        delay(10);
        return;
    }

    captureWord();
    printFeatures();
    delay(1000);
}

void captureWord() {
    for (uint16_t i = 0; i < NUM_SAMPLES; i++) {
        features[i] = readMic();
        delay(INTERVAL);
    }
}
void printFeatures() {
    const uint16_t numFeatures = sizeof(features) / sizeof(float);

    for (int i = 0; i < numFeatures; i++) {
        Serial.print(features[i]);
        Serial.print(i == numFeatures - 1 ? 'n' : ',');
    }
}
2.4 Fast Fourier Transform
Here we are with the Fourier Transform. When implemented in software, the most widely implementation of the FT is actually called Fast Fourier Transform (FFT), which is - as you may guess - a fast implementation of the FT.
Luckily for us, there exists a library for Arduino that does FFT.
And is so easy to use that we only need a line to get usable results!
#include <arduinoFFT.h>

arduinoFFT fft;

void captureWord() {
    for (uint16_t i = 0; i < NUM_SAMPLES; i++) {
        featuresForFFT[i] = readMic();
        delay(INTERVAL);
    }

    fft.Windowing(featuresForFFT, NUM_SAMPLES, FFT_WIN_TYP_HAMMING, FFT_FORWARD);

    for (int i = 0; i < NUM_SAMPLES; i++)
        features[i] = featuresForFFT[i];
}
You don't need to know what the Windowing function actually does (I don't either): what matters is that it extracts meaningful informations from our signal. Since it overwrites the features array, after calling that line we have what we need to input to our classifier.
At this point, record 10-15 samples for each word and save them to a file, one for each word.
3. Train and export the classifier
For a detailed guide refer to the tutorial
from sklearn.ensemble import RandomForestClassifier
from micromlgen import port

# put your samples in the dataset folder
# one class per file
# one feature vector per line, in CSV format
features, classmap = load_features('dataset/')
X, y = features[:, :-1], features[:, -1]
classifier = RandomForestClassifier(n_estimators=30, max_depth=10).fit(X, y)
c_code = port(classifier, classmap=classmap)
print(c_code)
At this point you have to copy the printed code and import it in your Arduino project, in a file called model.h.
In this project on Machine learning we're not achieving 100% accuracy easily.
Audio is quite noise, so you should experiment with a few params for the classifier and choose the ones that perform best. I'll showcase a few examples:
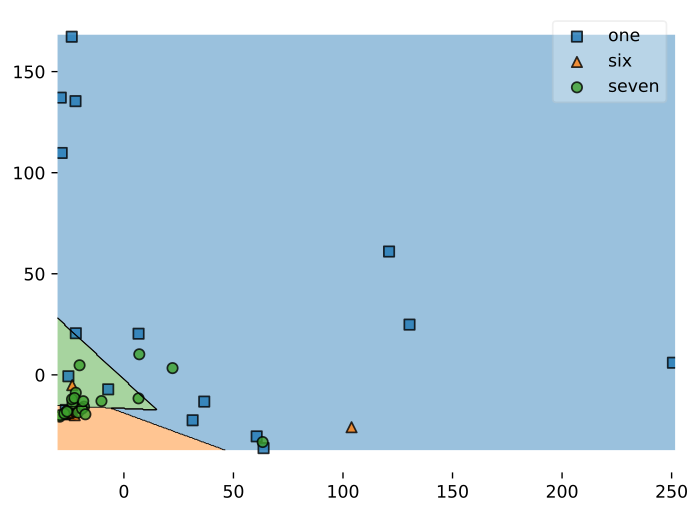
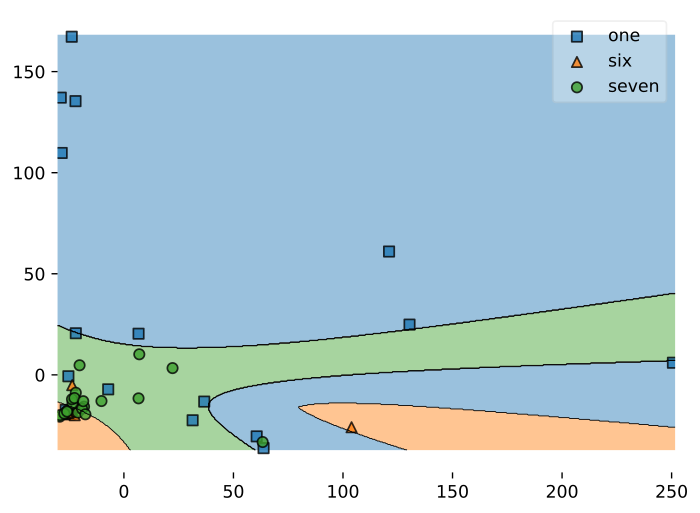
2.5 Select a suitable model
Here's an overview table of the 3 tests I did.
| Kernel | No. support vectors | Avg. accuracy |
|---|---|---|
| Linear | 22 | 87% |
| Poly 3 | 29 | 91% |
| RBF | 36 | 94% |
Of course the one with the RBF kernel would be the most desiderable since it has a very high accuracy: 36 support vectors, tough, will produce a model too large to fit on an Arduino Nano.
So you're forced to pick the one with the highest accuracy that fit on your board: in my case it was the Linear kernel one.
4. Run the inference
#include "model.h"

void loop() {
    if (!soundDetected()) {
        delay(10);
        return;
    }

    captureWord();
    Serial.print("You said ");
    Serial.println(classIdxToName(predict(features)));

    delay(1000);
}
And that's it: word classification through machine learning on your Arduino board! Say some word and see the classification result on the Serial monitor.
Here's me testing the system (English is not my language, so forgive my bad pronounce). The video quality is very low, I know, but you get the point.
Troubleshooting
It can happen that when running micromlgen.port(clf) you get a TemplateNotFound error. To solve the problem, first of all uninstall micromlgen.
pip uninstall micromlgenThen head to Github, download the package as zip and extract the micromlgen folder into your project.
Did you find this tutorial useful? Was is it easy to follow or did I miss something? Let me know in the comments so I can keep improving the blog.
Check the full project code on Github