
In this Arduno Machine learning project we're going to identify the letters from the Morse alphabet.
In practice, we'll translate dots (•) and dashes (‒) "typed" with a push button into meaningful characters.
In this tutorial we're going to target an Arduino Nano board (old generation), equipped with 32 kb of flash and only 2 kb of RAM.

Table of contents
1. Features definition
For our task we'll use a simple push button as input and a fixed number of samples taken at a fixed interval (100 ms), starting from the first detection of the button press. I chose to record 30 samples for each letter, but you can easily customize the value as per your needs.
With 30 samples at 100 ms frequency, we'll have 3 seconds to "type" the letter and on the Serial monitor will appear a sequence of 0s and 1s, representing if the button was pressed or not; the inference procedure will translate this sequence into a letter.
As a reference, here are a couple example of what we'll be working with.
// A (•‒)
0,0,0,1,1,1,1,1,1,0,0,0,0,0,0,0,0,0,1,1,1,1,1,1,1,1,1,1,1,1

// D (‒••)
0,0,0,0,0,0,0,0,0,0,1,1,1,1,0,0,0,1,1,1,1,0,0,0,1,1,1,1,1,1

// E (•)
0,0,0,1,1,1,1,1,1,1,1,1,1,1,1,1,1,1,1,1,1,1,1,1,1,1,1,1,1,1
2. Record sample data
To the bare minimum, we'll need a push button and two wires: one to ground and the other to a digital pin. Since in the example we'll make the button an INPUT_PULLUP, we'll read 0 when the button is pressed and 1 when not.
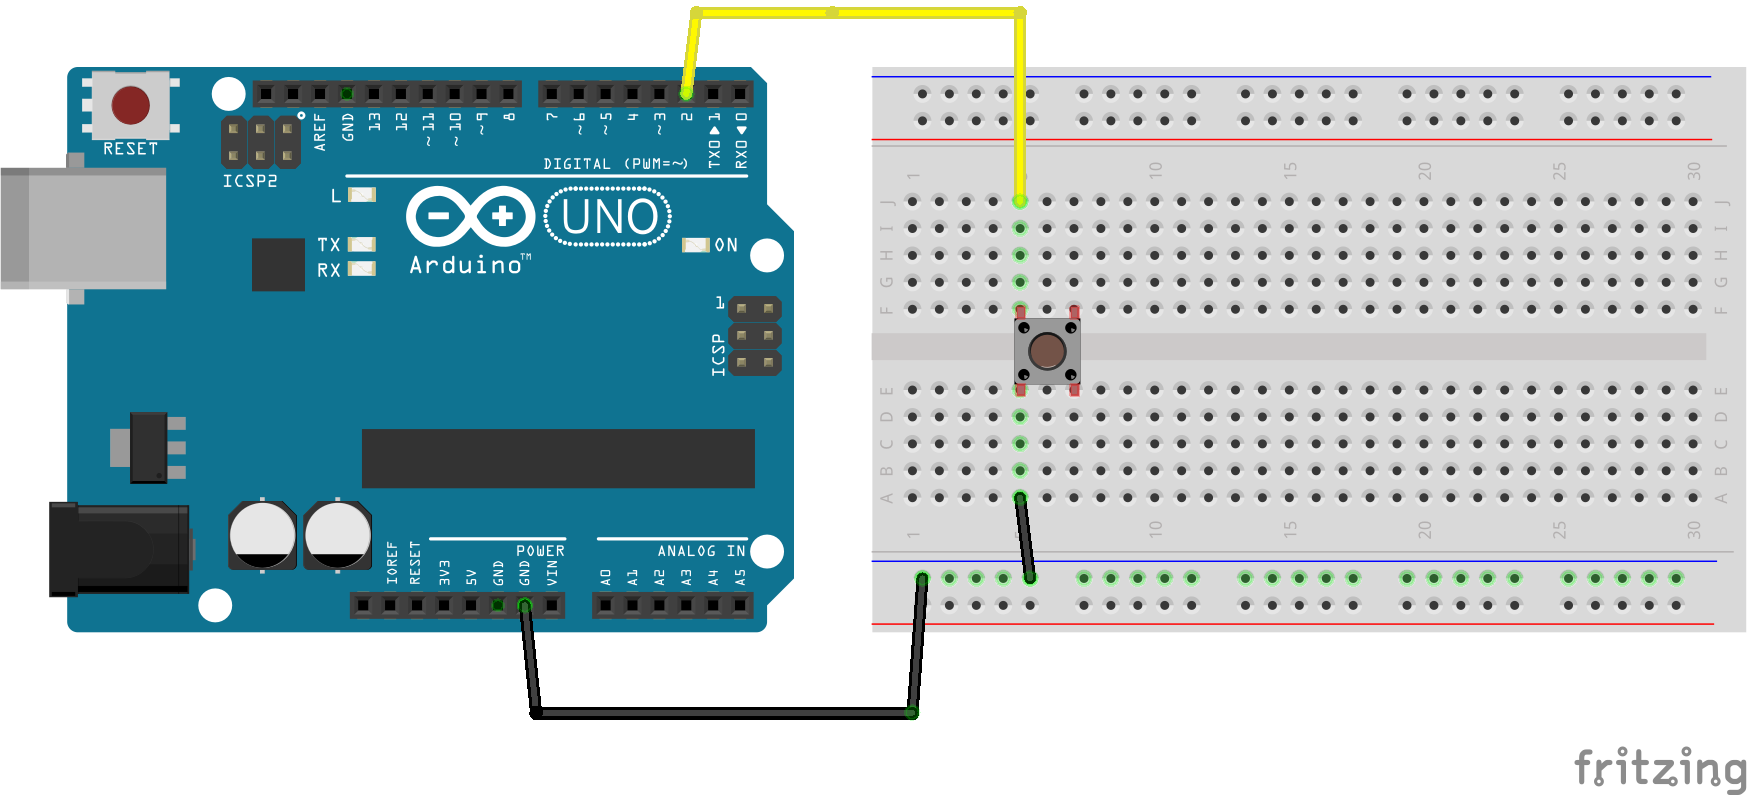
All we need to do is detect a press and record the following 30 samples of the digital pin:
#define IN 4
#define NUM_SAMPLES 30
#define INTERVAL 100

double features[NUM_SAMPLES];

void setup() {
  Serial.begin(115200);
  pinMode(IN, INPUT_PULLUP);
}

void loop() {
  if (digitalRead(IN) == 0) {
    recordButtonStatus();
    printFeatures();
    delay(1000);
  }

  delay(10);
}

void recordButtonStatus() {
  for (int i = 0; i < NUM_SAMPLES; i++) {
    features[i] = digitalRead(IN);
    delay(INTERVAL);
  }
}
void printFeatures() {
    const uint16_t numFeatures = sizeof(features) / sizeof(float);

    for (int i = 0; i < numFeatures; i++) {
        Serial.print(features[i]);
        Serial.print(i == numFeatures - 1 ? 'n' : ',');
    }
}
Open the Serial monitor and type a few times each letter: try to introduce some variations each time, for example waiting some more milliseconds before releasing the dash.
Save the recordings for each letter in a file named after the letter, so you will get meaningful results later on.
You may end with duplicate recordings: don't worry, that's not a problem. I'll paste my recordings for a few letters, as a reference.
// A (•‒)
0,0,0,1,1,1,1,1,1,0,0,0,0,0,0,0,0,0,1,1,1,1,1,1,1,1,1,1,1,1
0,0,0,0,0,1,1,1,1,0,0,0,0,0,0,0,0,0,0,1,1,1,1,1,1,1,1,1,1,1
0,0,0,0,0,1,1,1,1,0,0,0,0,0,0,0,1,1,1,1,1,1,1,1,1,1,1,1,1,1
0,0,0,0,1,1,1,1,1,0,0,0,0,0,0,0,0,0,0,0,1,1,1,1,1,1,1,1,1,1
0,0,0,0,1,1,1,1,1,0,0,0,0,0,0,0,0,0,1,1,1,1,1,1,1,1,1,1,1,1
0,0,0,0,1,1,1,1,0,0,0,0,0,0,0,0,0,1,1,1,1,1,1,1,1,1,1,1,1,1
0,0,0,0,1,1,1,1,1,1,0,0,0,0,0,0,0,0,0,1,1,1,1,1,1,1,1,1,1,1

// D (‒••)
0,0,0,0,0,0,0,0,0,0,1,1,1,1,0,0,0,1,1,1,1,0,0,0,1,1,1,1,1,1
0,0,0,0,0,0,0,0,0,1,1,1,1,1,0,0,0,1,1,1,1,0,0,0,1,1,1,1,1,1
0,0,0,0,0,0,0,0,0,1,1,1,1,0,0,0,1,1,1,1,0,0,0,1,1,1,1,1,1,1
0,0,0,0,0,0,0,0,0,1,1,1,1,1,0,0,0,1,1,1,0,0,0,1,1,1,1,1,1,1
0,0,0,0,0,0,0,0,0,1,1,1,1,1,0,0,1,1,1,1,0,0,0,1,1,1,1,1,1,1
0,0,0,0,0,0,0,0,0,0,1,1,1,1,0,0,0,1,1,1,1,0,0,1,1,1,1,1,1,1
0,0,0,0,0,0,0,0,0,0,1,1,1,1,1,0,0,1,1,1,1,0,0,1,1,1,1,1,1,1
0,0,0,0,0,0,0,0,0,1,1,1,1,1,0,0,0,1,1,1,1,0,0,1,1,1,1,1,1,1
0,0,0,0,0,0,0,0,0,1,1,1,1,1,0,0,1,1,1,1,1,0,0,1,1,1,1,1,1,1

// E (•)
0,0,0,1,1,1,1,1,1,1,1,1,1,1,1,1,1,1,1,1,1,1,1,1,1,1,1,1,1,1
0,0,0,0,1,1,1,1,1,1,1,1,1,1,1,1,1,1,1,1,1,1,1,1,1,1,1,1,1,1
0,1,1,1,1,1,1,1,1,1,1,1,1,1,1,1,1,1,1,1,1,1,1,1,1,1,1,1,1,1
0,0,1,1,1,1,1,1,1,1,1,1,1,1,1,1,1,1,1,1,1,1,1,1,1,1,1,1,1,1

// S (•••)
0,0,0,1,1,1,0,0,0,1,1,1,0,0,1,1,1,1,1,1,1,1,1,1,1,1,1,1,1,1
0,0,0,1,1,1,1,0,0,0,1,1,1,0,0,1,1,1,1,1,1,1,1,1,1,1,1,1,1,1
0,0,0,1,1,1,1,0,0,0,1,1,1,1,0,0,1,1,1,1,1,1,1,1,1,1,1,1,1,1
0,0,0,1,1,1,1,0,0,1,1,1,1,0,0,1,1,1,1,1,1,1,1,1,1,1,1,1,1,1
0,0,0,1,1,1,1,0,0,1,1,1,1,0,0,0,1,1,1,1,1,1,1,1,1,1,1,1,1,1
0,0,0,1,1,1,1,0,0,1,1,1,0,0,1,1,1,1,1,1,1,1,1,1,1,1,1,1,1,1

// T (‒)
0,0,0,0,0,0,1,1,1,1,1,1,1,1,1,1,1,1,1,1,1,1,1,1,1,1,1,1,1,1
0,0,0,0,0,0,0,1,1,1,1,1,1,1,1,1,1,1,1,1,1,1,1,1,1,1,1,1,1,1
0,0,0,0,0,0,0,0,1,1,1,1,1,1,1,1,1,1,1,1,1,1,1,1,1,1,1,1,1,1
If you do a good job, you should end with quite distinguible features, as show in the plot below.

3. Train and export the classifier
For a detailed guide refer to the tutorial
from sklearn.ensemble import RandomForestClassifier
from micromlgen import port

# put your samples in the dataset folder
# one class per file
# one feature vector per line, in CSV format
features, classmap = load_features('dataset/')
X, y = features[:, :-1], features[:, -1]
classifier = RandomForestClassifier(n_estimators=30, max_depth=10).fit(X, y)
c_code = port(classifier, classmap=classmap)
print(c_code)
At this point you have to copy the printed code and import it in your Arduino project, in a file called model.h.
4. Run the inference
#include "model.h"

void loop() {
  if (digitalRead(IN) == 0) {
    recordButtonStatus();
    Serial.print("Detected letter: ");
    Serial.println(classIdxToName(predict(features)));
    delay(1000);
  }

  delay(10);
}
Type some letter using the push button and see the identified value printed on the serial monitor.
That’s it: you deployed machine learning in 2 Kb!
Project figures
On my machine, the sketch targeted at the Arduino Nano (old generation) requires 12546 bytes (40%) of program space and 366 bytes (17%) of RAM. This means you could actually run machine learning in even less space than what the Arduino Nano provides. So, the answer to the question Can I run machine learning on Arduino? is definetly YES.
Did you find this tutorial useful? Was is it easy to follow or did I miss something? Let me know in the comments so I can keep improving the blog.
Check the full project code on Github